The manual
How to use inbyte.io
Updated 1 November 2026. The screenshots come from a demonstration workspace, so the names and dates in them are made up.
Chapter 1
Welcome
inbyte.io turns an invitation for any occasion — a wedding, a birthday, a christening, a debut, an anniversary, a company night — into one link. Your guests open it on their phone: an envelope that opens, the details, the places with maps, the people, the photos, and a reply form whose answers come straight back to you.
Three kinds of people use it:
- Clients sign in with their email, get a workspace of their own, make invitations in the Studio (with the AI designer, or by hand), choose and pay a plan, publish, and watch the replies come in.
- Guests open the link. They never sign in: they read, add the date to their calendar, open the map, and reply.
- The platform administrator runs inbyte.io itself from the Platform console: every workspace, every plan and its payments, the templates, the prices, the AI settings.
This manual follows that order. Chapters 2 to 8 are for clients, from signing in to sharing the link and paying for a plan. Chapter 9 covers the full workspace behind the Studio: the advanced editor, events with registration and tickets, places with reservations. Chapter 10 is for administrators.
Chapter 2
Signing in
Your email is your account. There is no password: type your address and press Email me a login link. The link in the mail signs you in; it works once and for 24 hours. Where Google sign-in is set up, Continue with Google does the same in one step.
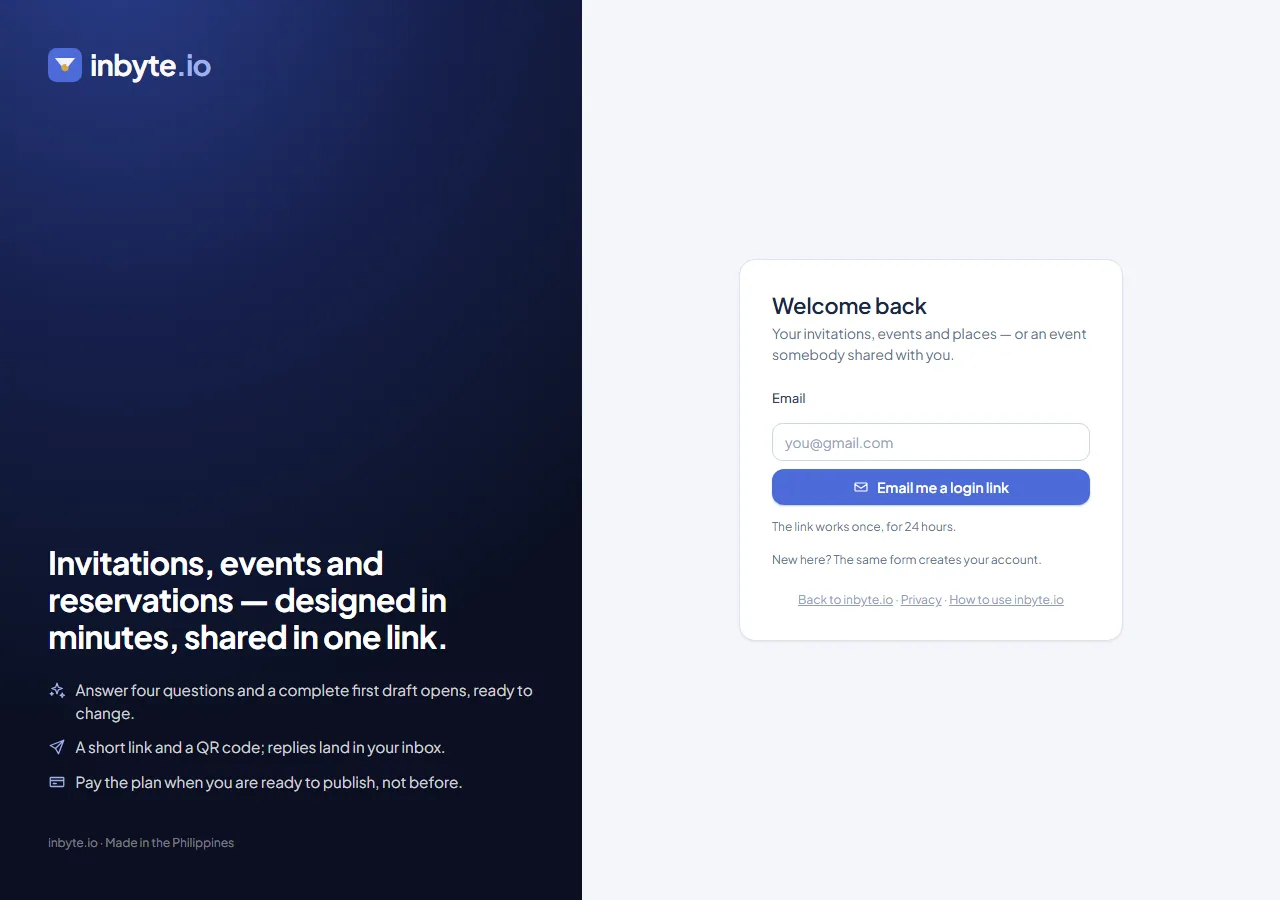
- A new address gets a workspace of its own, named after you, when sign-up is open. If the page says sign-up is by invitation, ask the person whose invitation you will work on to invite you (chapter 7), or the administrator.
- An address that was invited to a workspace, or to one invitation, lands in that workspace with the access it was given.
- After signing in you land on your home (chapter 3). The platform's administrators find the console on the same page, under the console link.
On a phone, use the browser's Add to Home Screen on your home page. The Studio then opens like an app, without the browser's bars.
Chapter 3
Your home
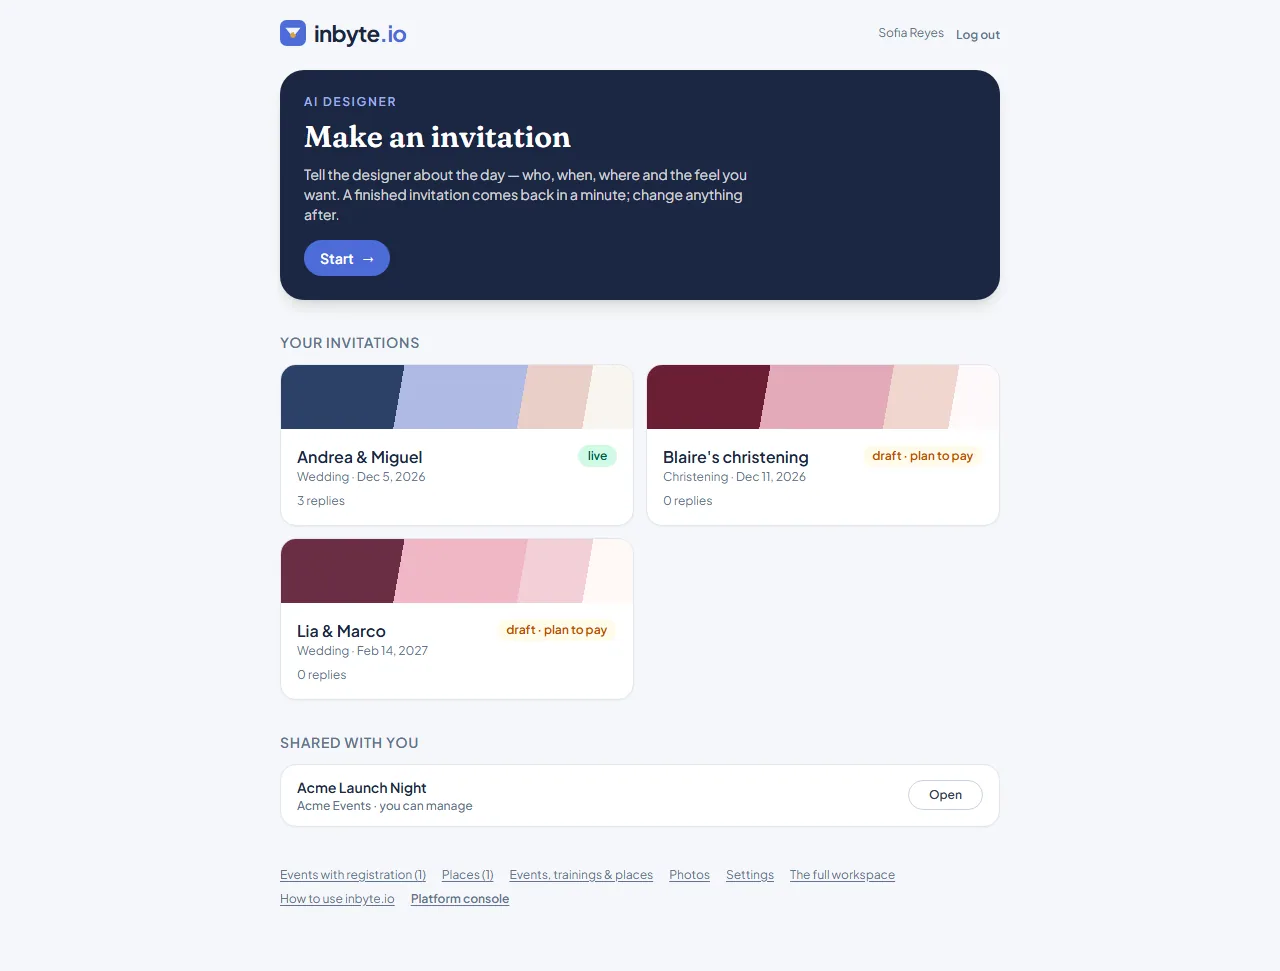
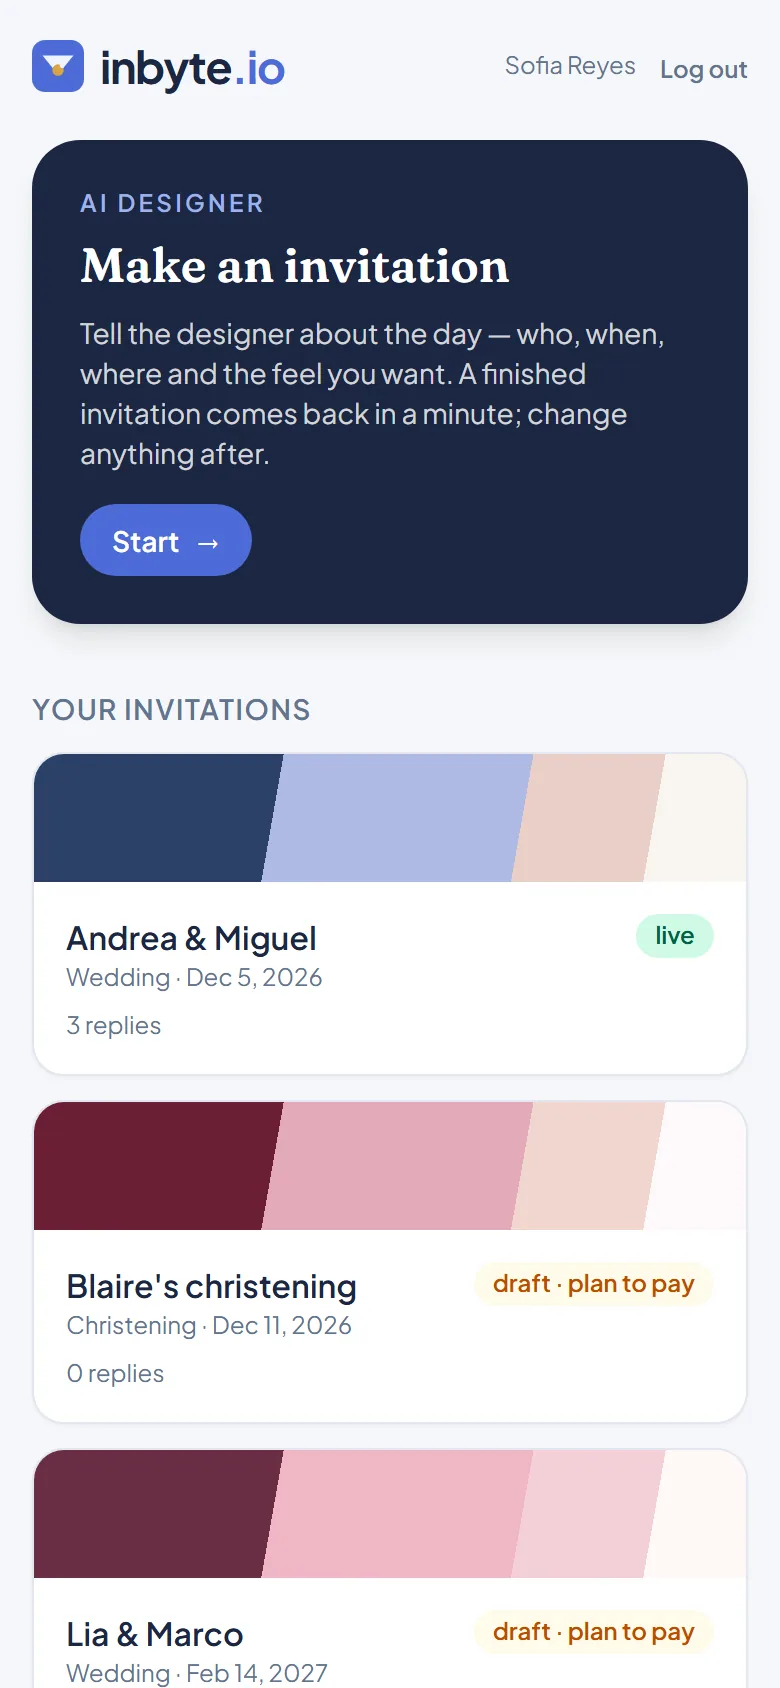
Home is your invitations as cards — a swatch of each one's colours, the date, and whether it is live, still a draft, or waiting for its plan to be paid — and one big door: Make an invitation. Tap a card to open that invitation in the Studio.
Chapter 4
Making an invitation
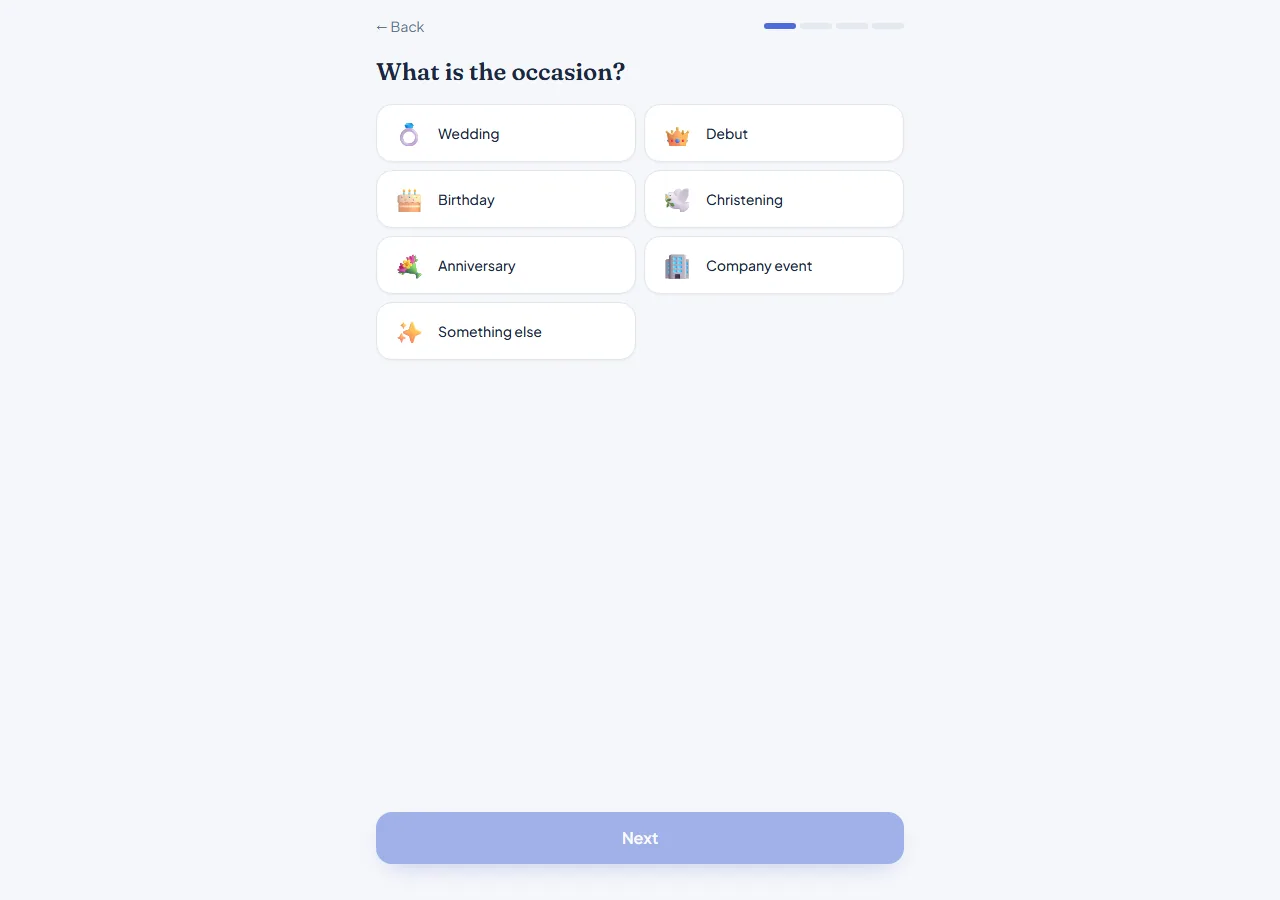
Make an invitation asks four questions, one screen each, and then designs the first draft for you. Every answer can be changed later in the Studio, so do not worry about getting it perfect.
- The occasion. Wedding, birthday, christening, debut, anniversary, a company event, or something else. The occasion decides which names the next screen asks for and which sections the invitation starts with.
- The names. The two names of a wedding or anniversary, the child's name for a christening, the celebrant and the age for a birthday or a debut, the event name and who hosts it for a company event — and the parents where they are usually named.
- When and where. The date and time, and the places: the ceremony and the reception for a wedding, or one venue. Each place takes a name and an address; the address becomes the map and the directions button.
- The feel. Tell the designer about it in your own words, pick a few style words and colours, add a main photo if you have one, a hashtag, and the language of the wording. Then press Design it.
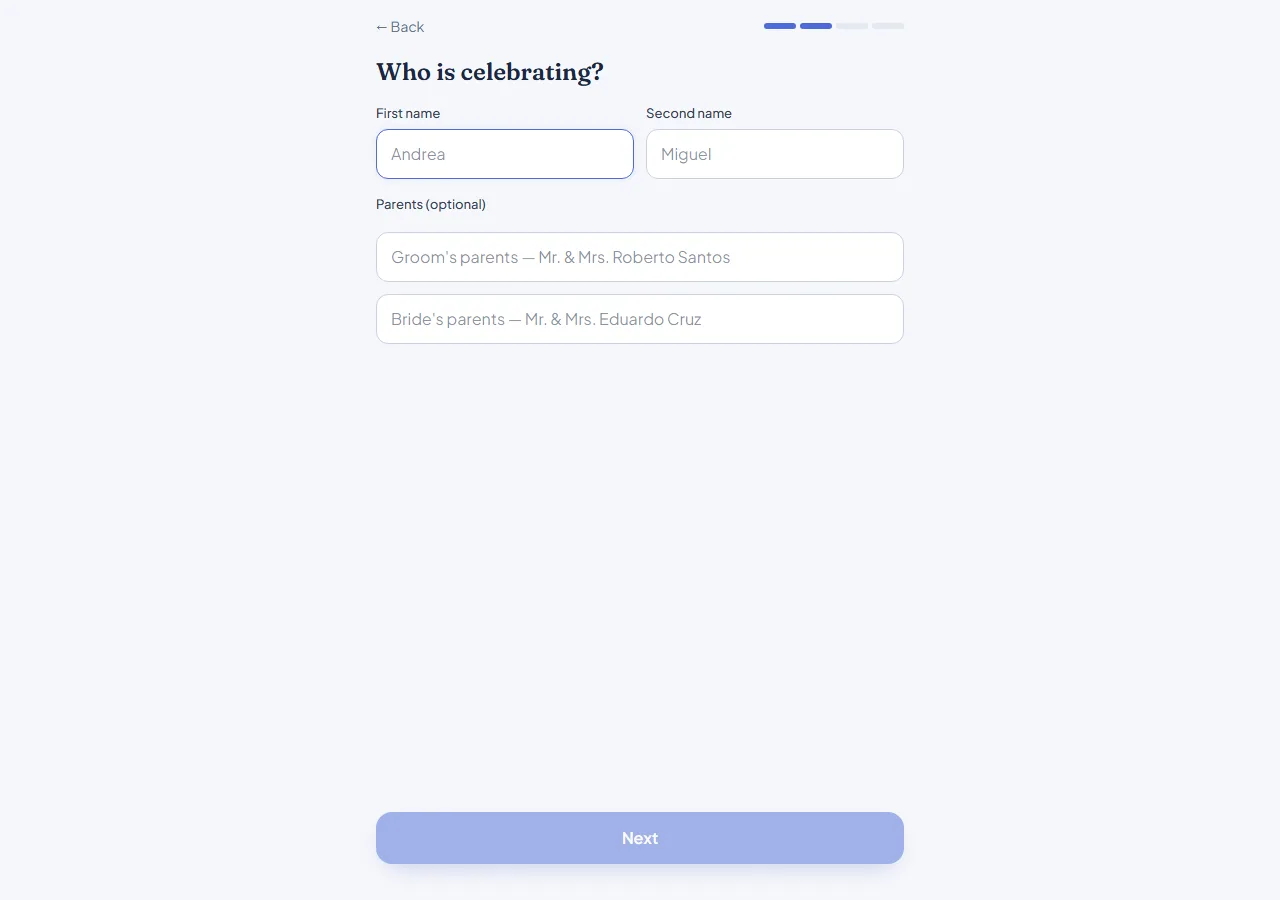
The designer works for up to a minute and the screen says what it is doing — reading your brief, choosing the colours, picking the fonts, writing the words, laying out the sections. When it is done, the Studio opens with the draft. If the AI designer is switched off on this server, the same four answers still make a complete draft from the template, which you then finish by hand.
Chapter 5
The Studio
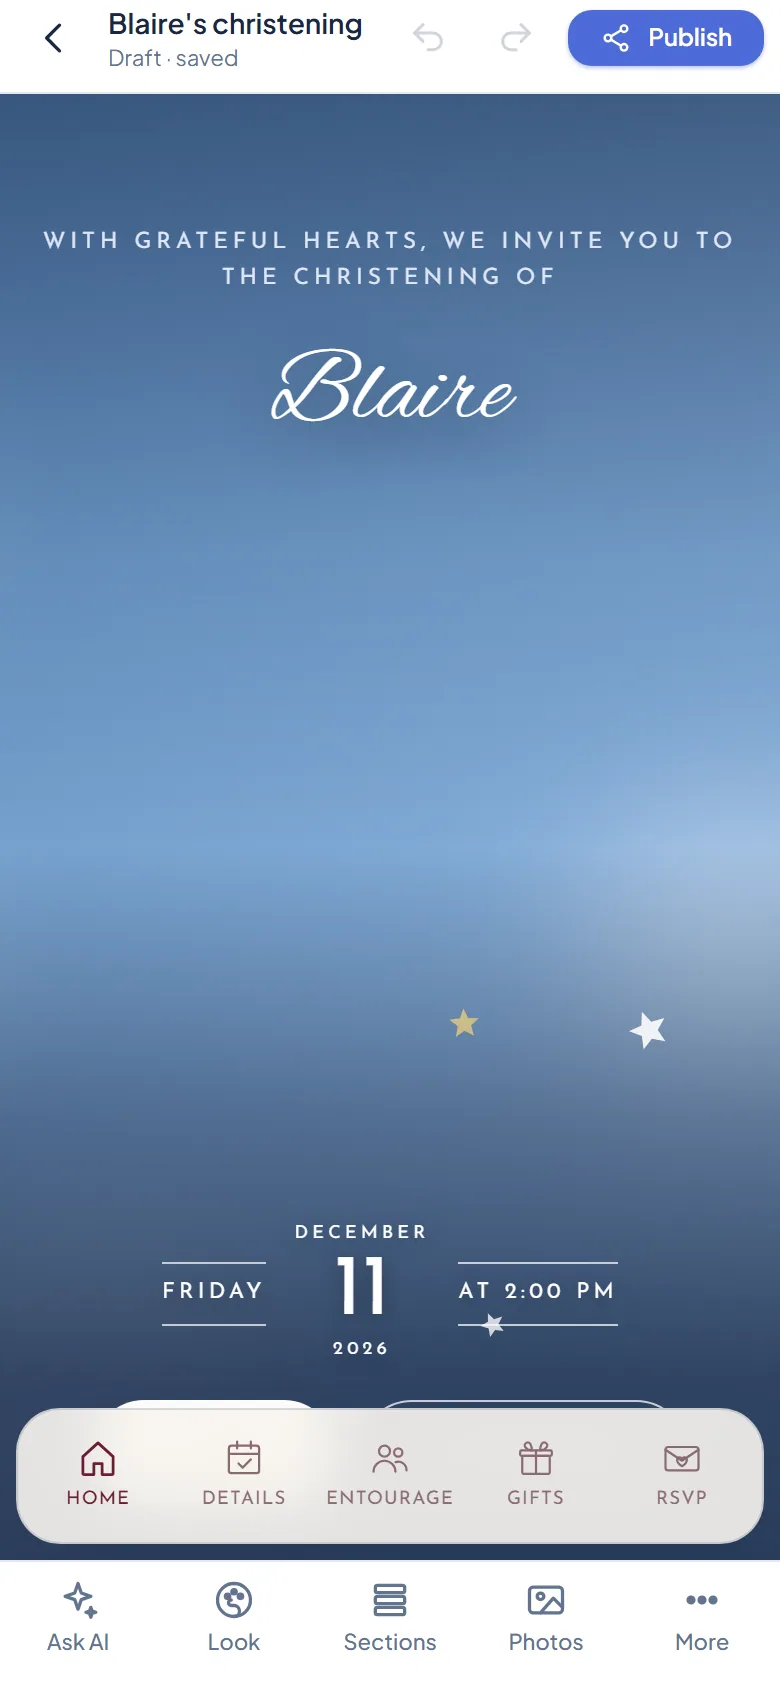
The Studio is the invitation itself, full screen, with the tools beside it on a computer and under it on a phone. What you see is the real page your guests will open, fed your draft as it changes. Every change is saved as you make it; nothing reaches your guests until you publish (chapter 6).
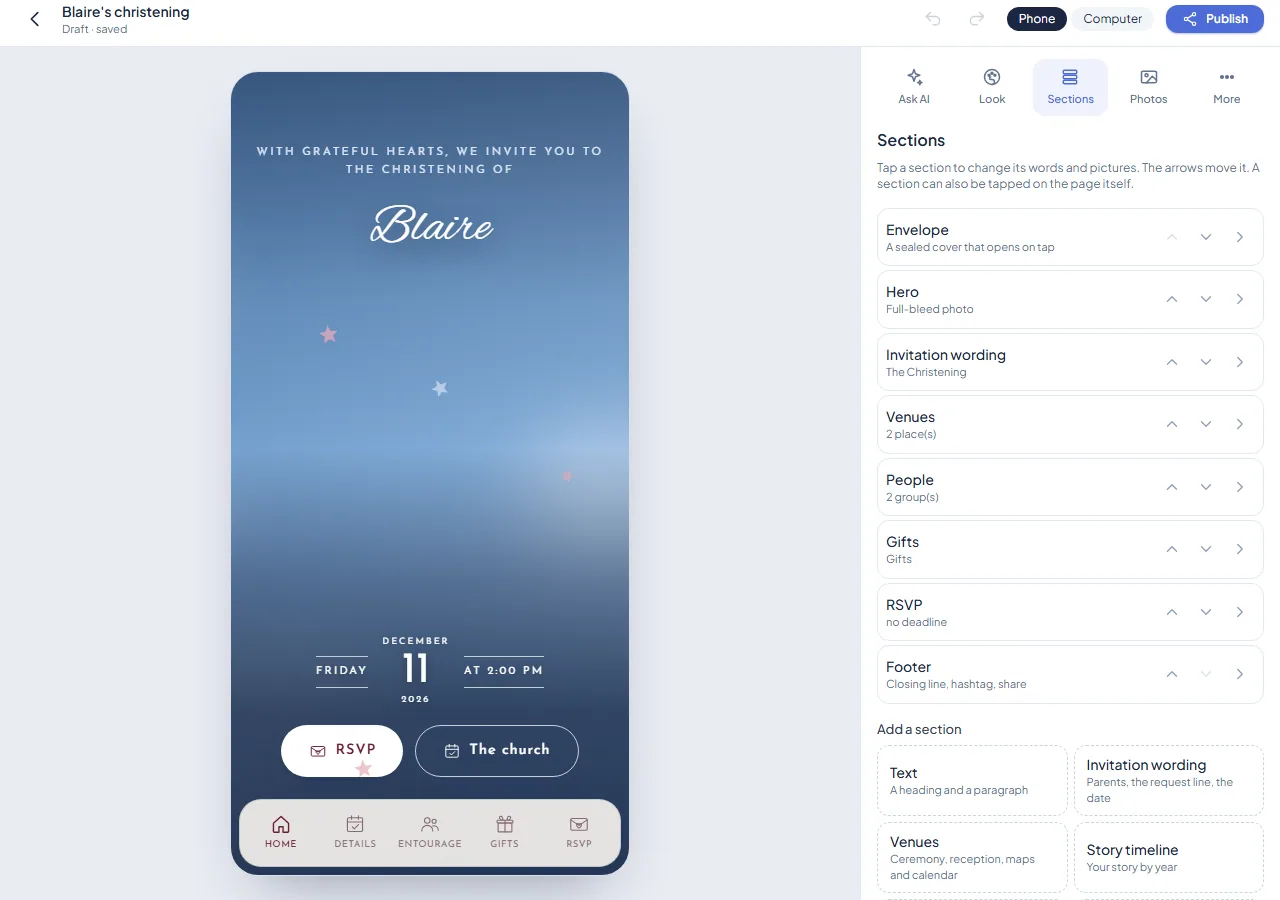
Ask AI
A sentence in, the whole design back. Type what you want — make the wording more formal, fewer words everywhere, add a programme of the day, say it in Taglish — or tap one of the ideas. The designer rewrites the draft and the Studio shows it at once; Undo takes it back if you prefer the old one.
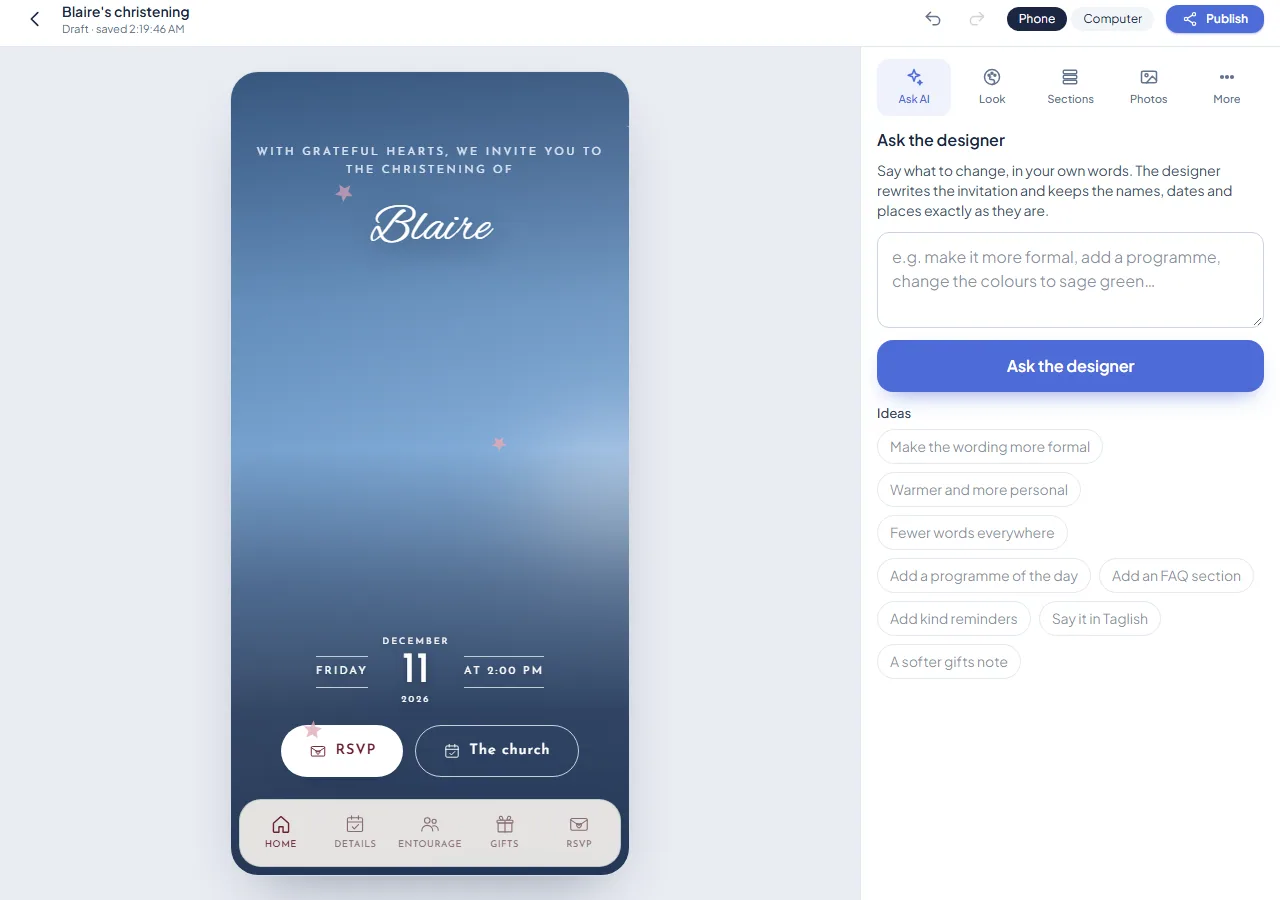
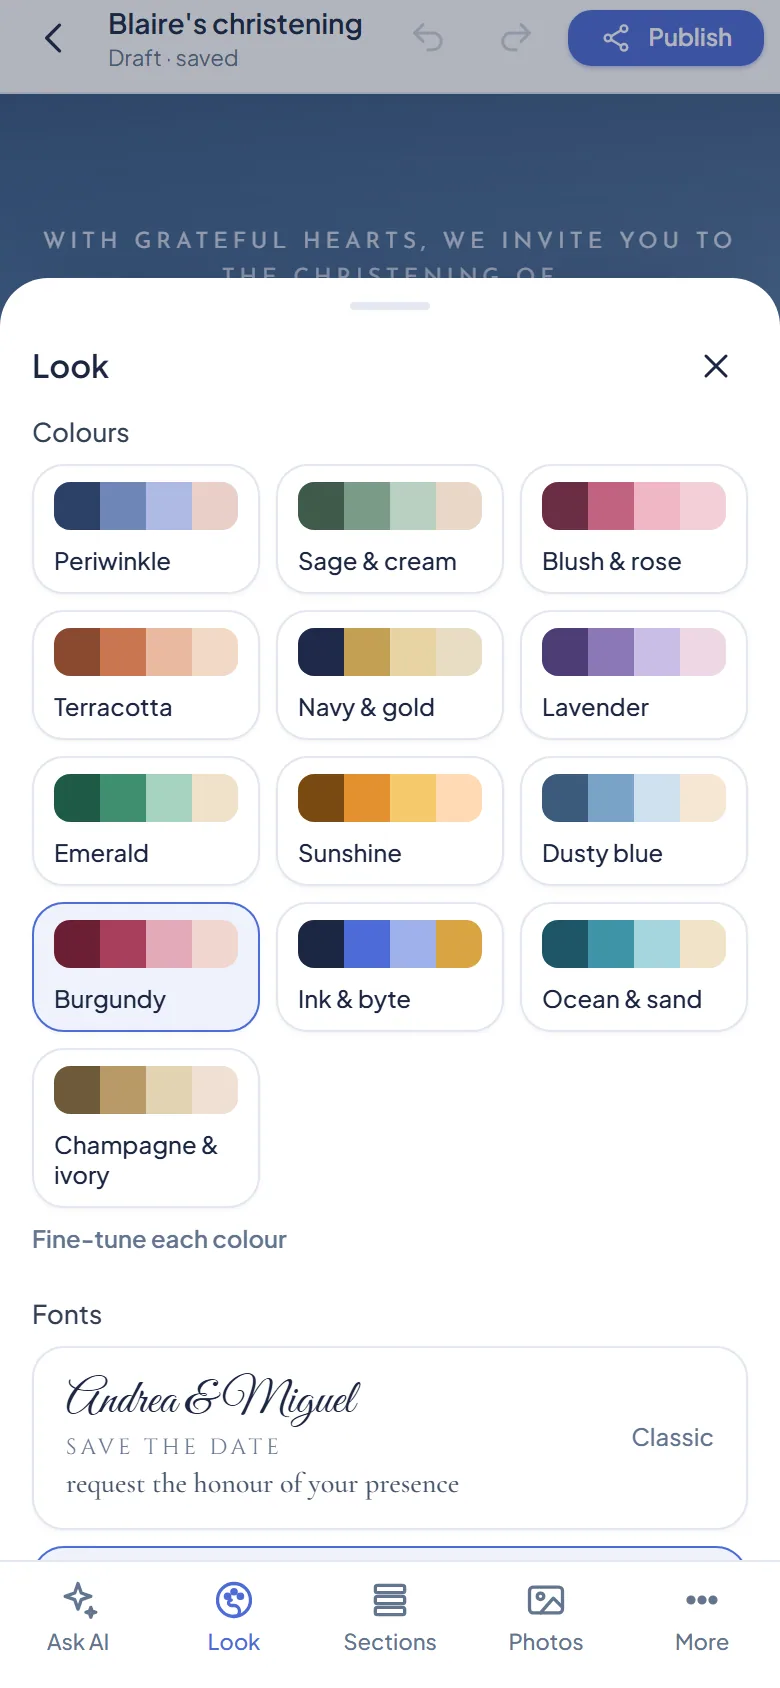
Look
Everything about how the page looks, with no AI needed: each tap changes the invitation on the spot.
- Colours — a palette per tap, and Fine-tune each colour for the headings, the accent, the florals, the page, the cards and the text.
- Fonts — the Classic, Romantic and Modern sets, each shown on a sample line so you can compare them.
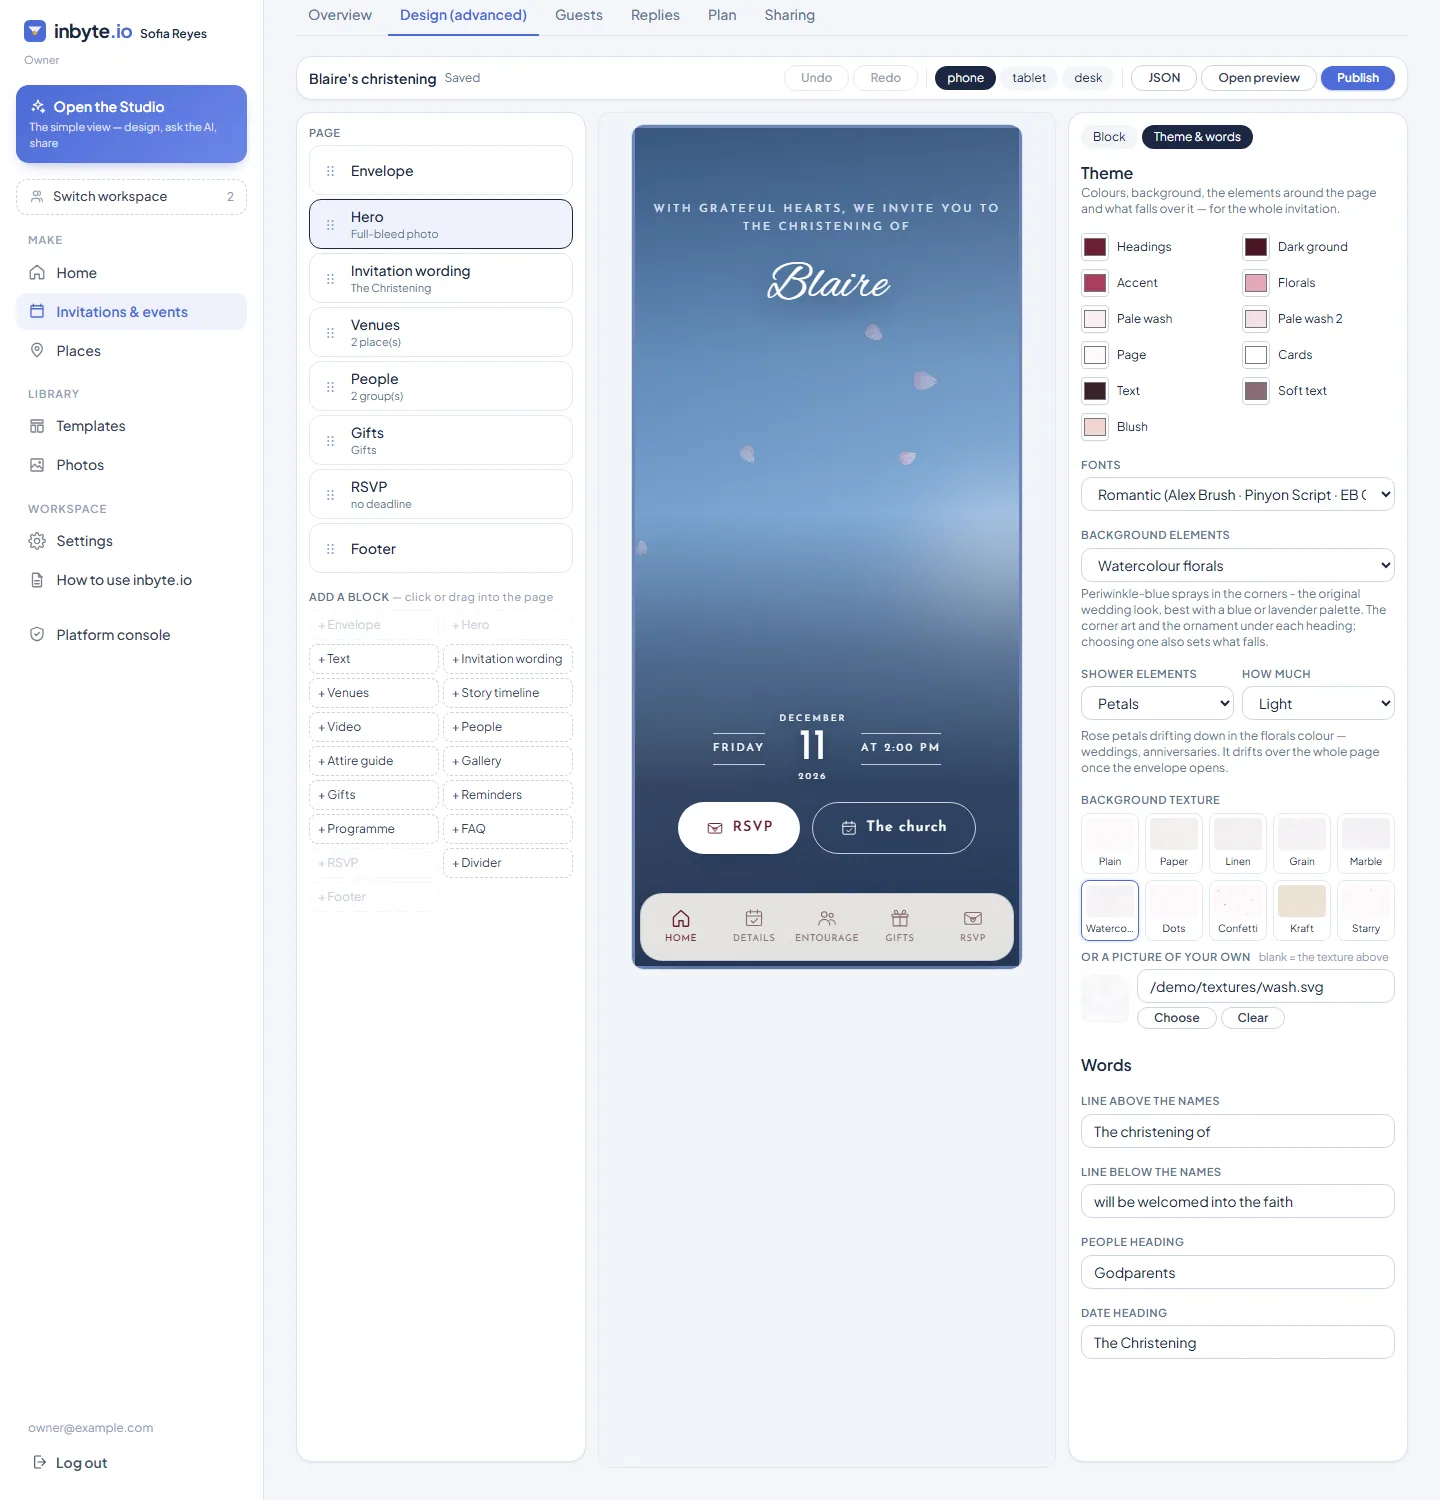
- Background elements — the art in the corners of every section, the ornament under every heading, and the sprig on the envelope: watercolour florals, botanical sprays, balloons, stars and a moon, sparkle, hearts, geometric arcs, tropical fronds, festive pine and snowflakes, or none. Each is drawn in your own colours, and choosing one also sets what falls over the page.
- Shower elements — what drifts over the page once the envelope opens: petals, blossoms, confetti, sparkles, leaves, snow, hearts, stars, or bubbles that rise — and how much of it: off, light, normal or heavy.
- Background — the texture the page is printed on: plain, paper, linen, grain, marble, watercolour, dots, confetti, kraft or starry. A picture of your own can be set in the advanced editor.
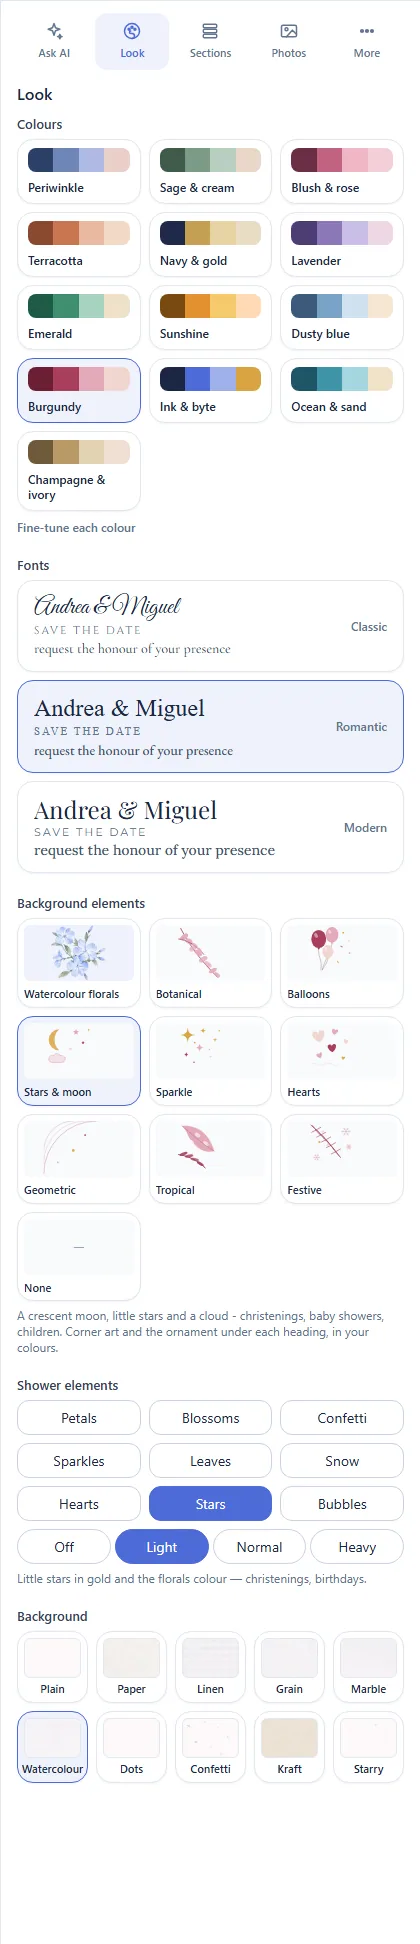
Sections
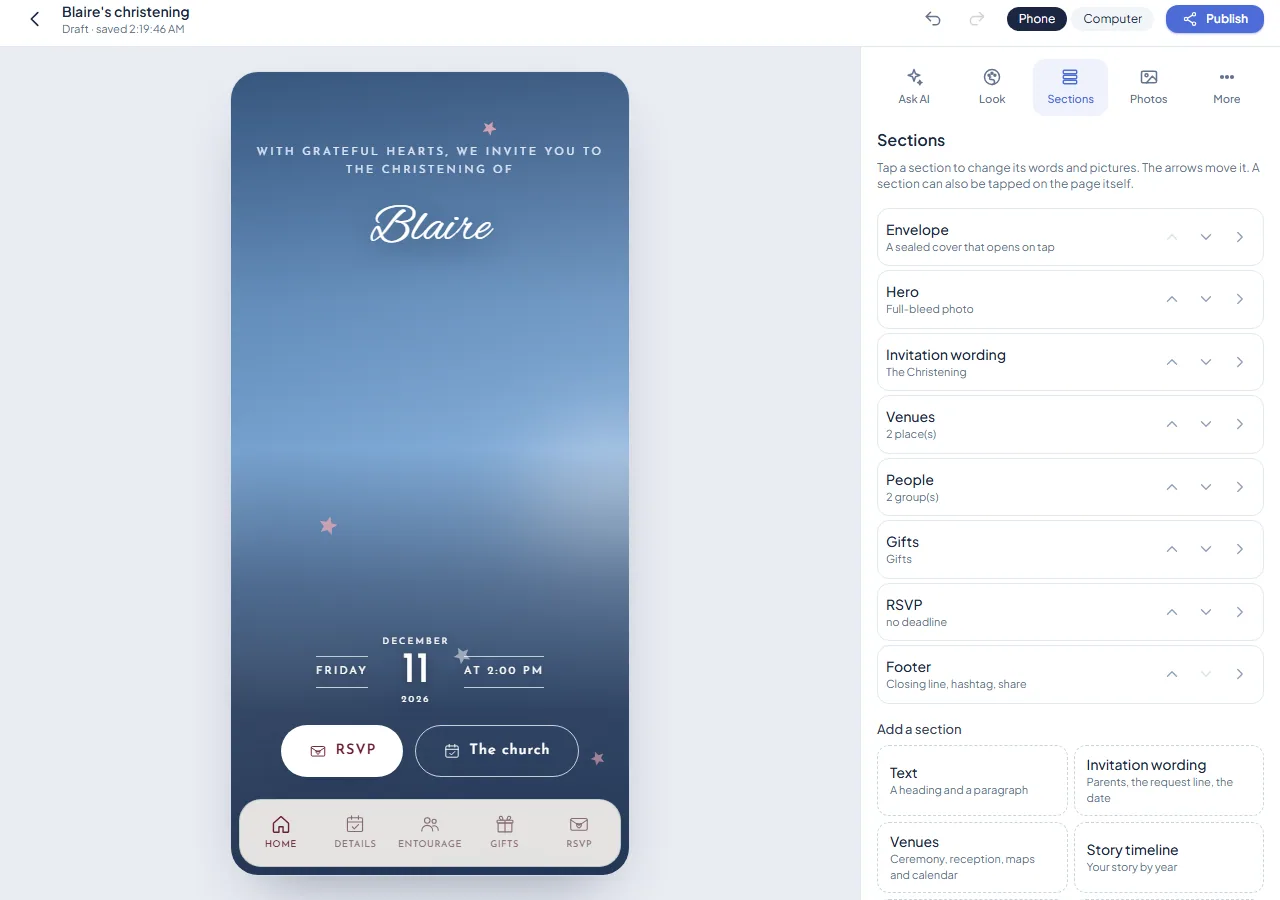
The page as a list. Tap a section to edit every one of its fields — the wording, the people, the places, the questions of the reply form — move it up or down with the arrows, take it off, or add one of the sections the invitation does not have yet: a programme of the day, the attire guide, gifts, reminders, a story timeline, a video, an FAQ.
Photos
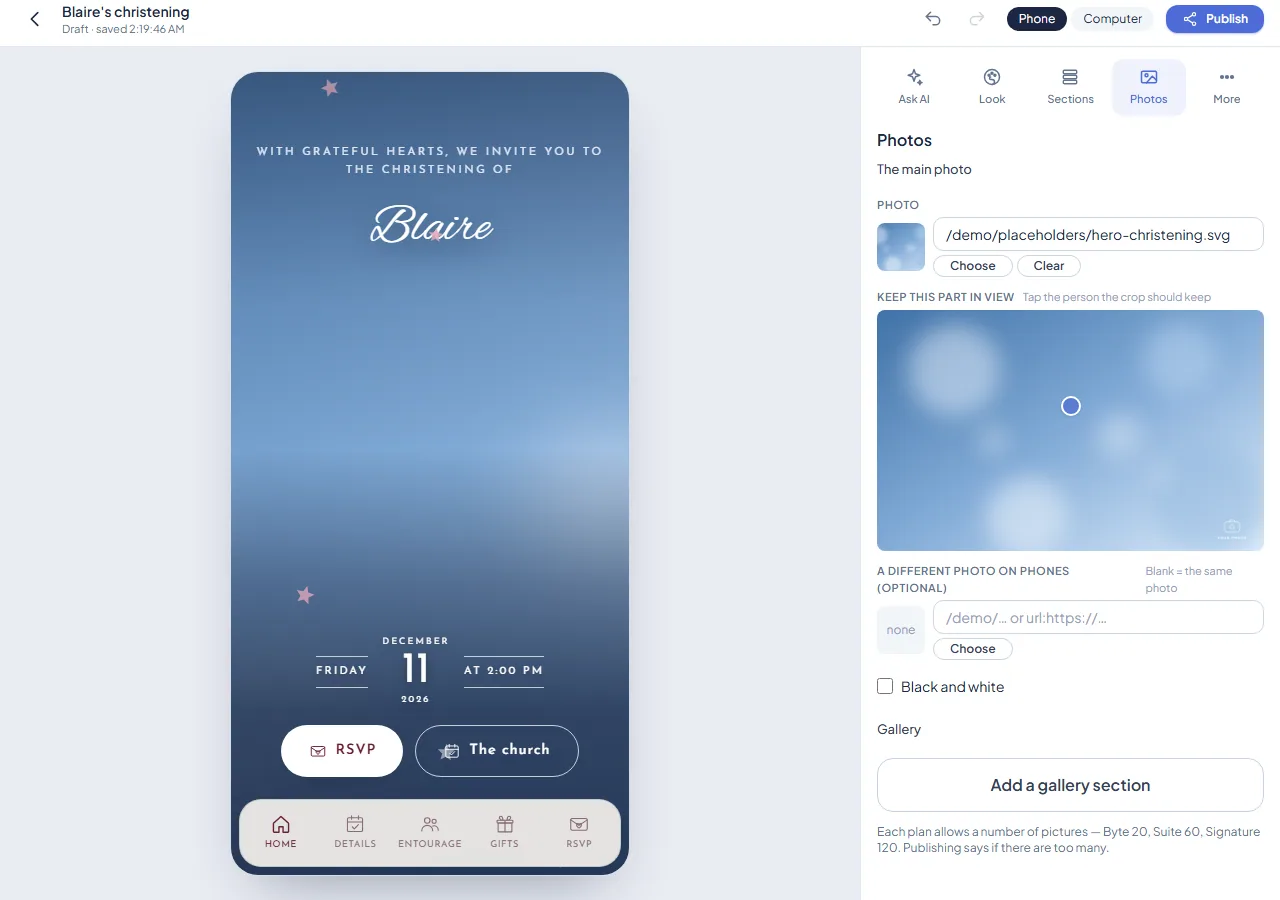
The main photo and where it is cropped, and the gallery. Upload from your phone or computer, pick from the pictures already in your workspace, or paste a link. How many photos an invitation may carry depends on its plan (chapter 8).
More
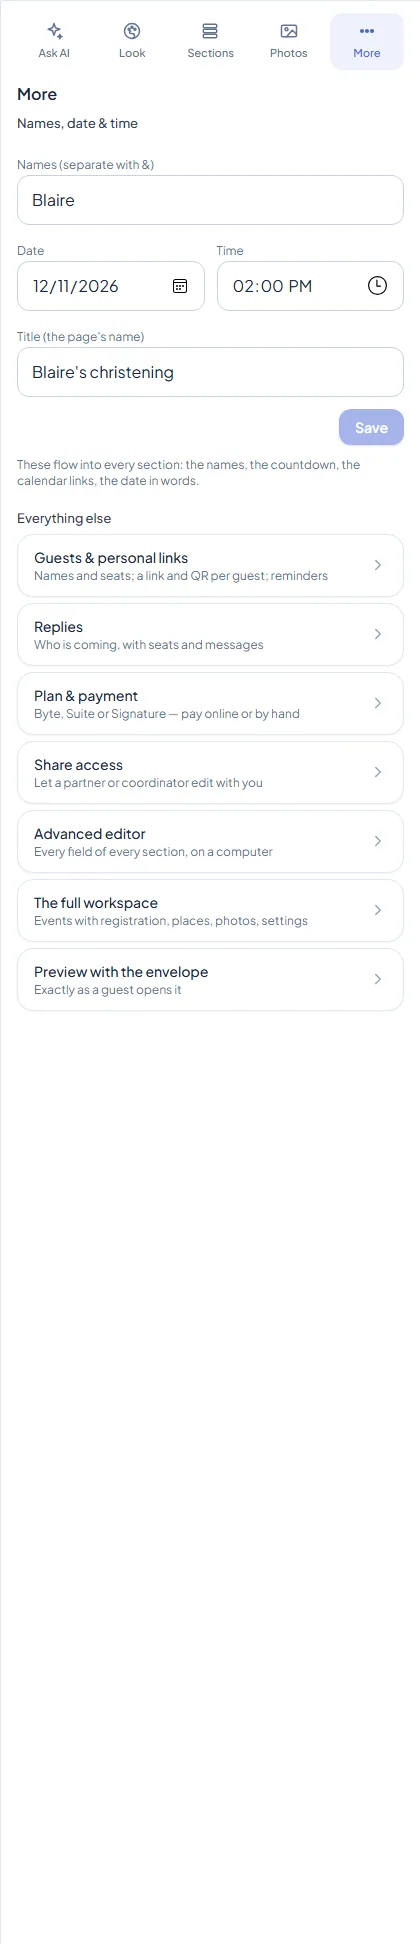
The facts every section reads — the names, the date, the time, and the page's title — and the doors to the rest: the guests and their personal links, the replies, the plan and its payment, who else works on it, the advanced editor, and the full workspace. Preview with the envelope opens the page exactly as a guest will see it.
Chapter 6
Sharing it and the replies
Press Publish at the top right, then Publish on the sheet that opens. It checks the plan and the package — a plan still unpaid, or more photos than the package allows, is said by name — and then the invitation is live at its link. Publishing again sends the latest changes; what guests already opened keeps working.
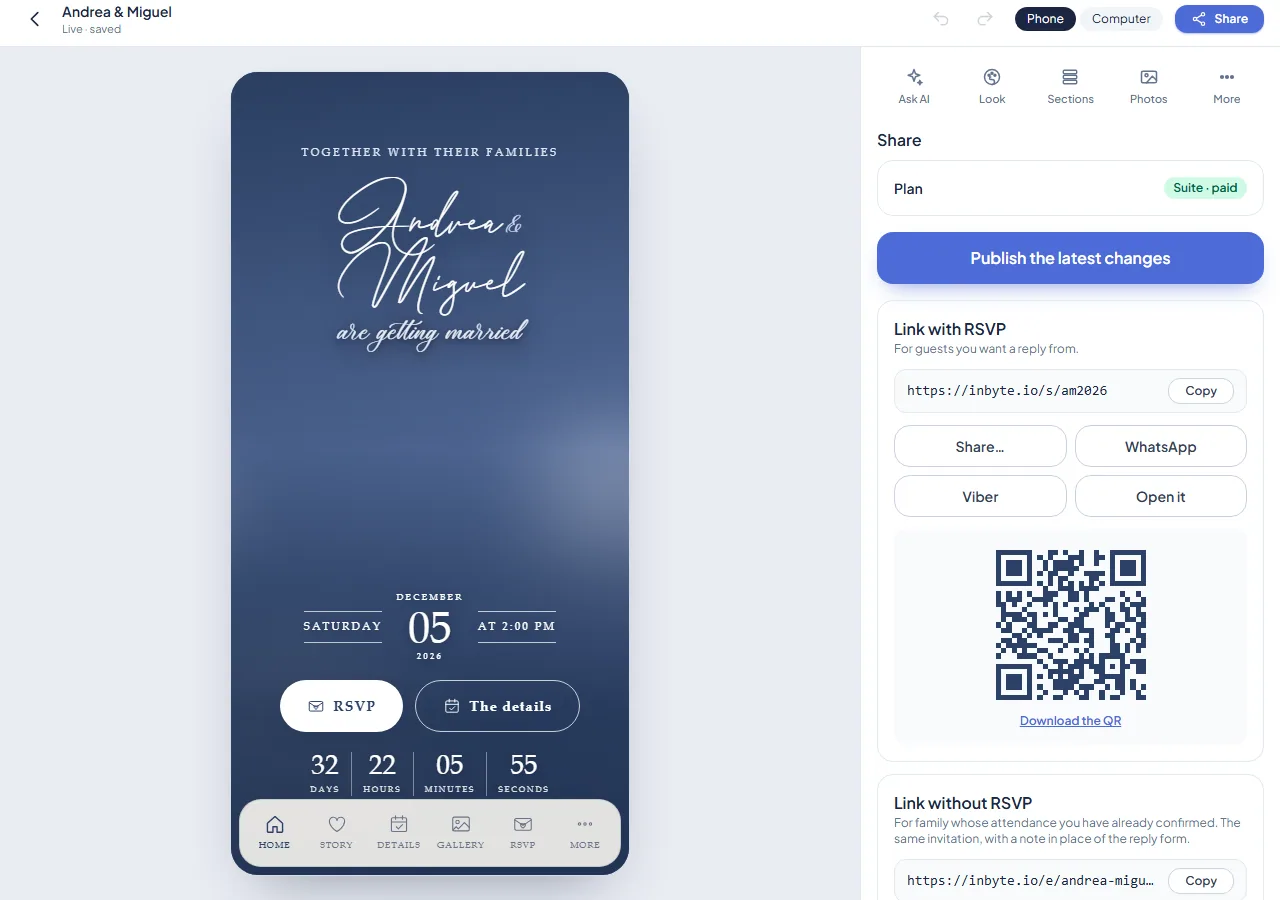
There are two links, each with its own QR code. The link with RSVP is for guests you want a reply from. The link without RSVP is the same invitation with a note in place of the reply form, for family whose attendance you have already confirmed. The note says that no further RSVP is needed and asks them to keep the invitation private; change its words under the RSVP section if your guests are not a family. It is a courtesy rather than a lock, since somebody who is sent both can use either.
What a guest sees
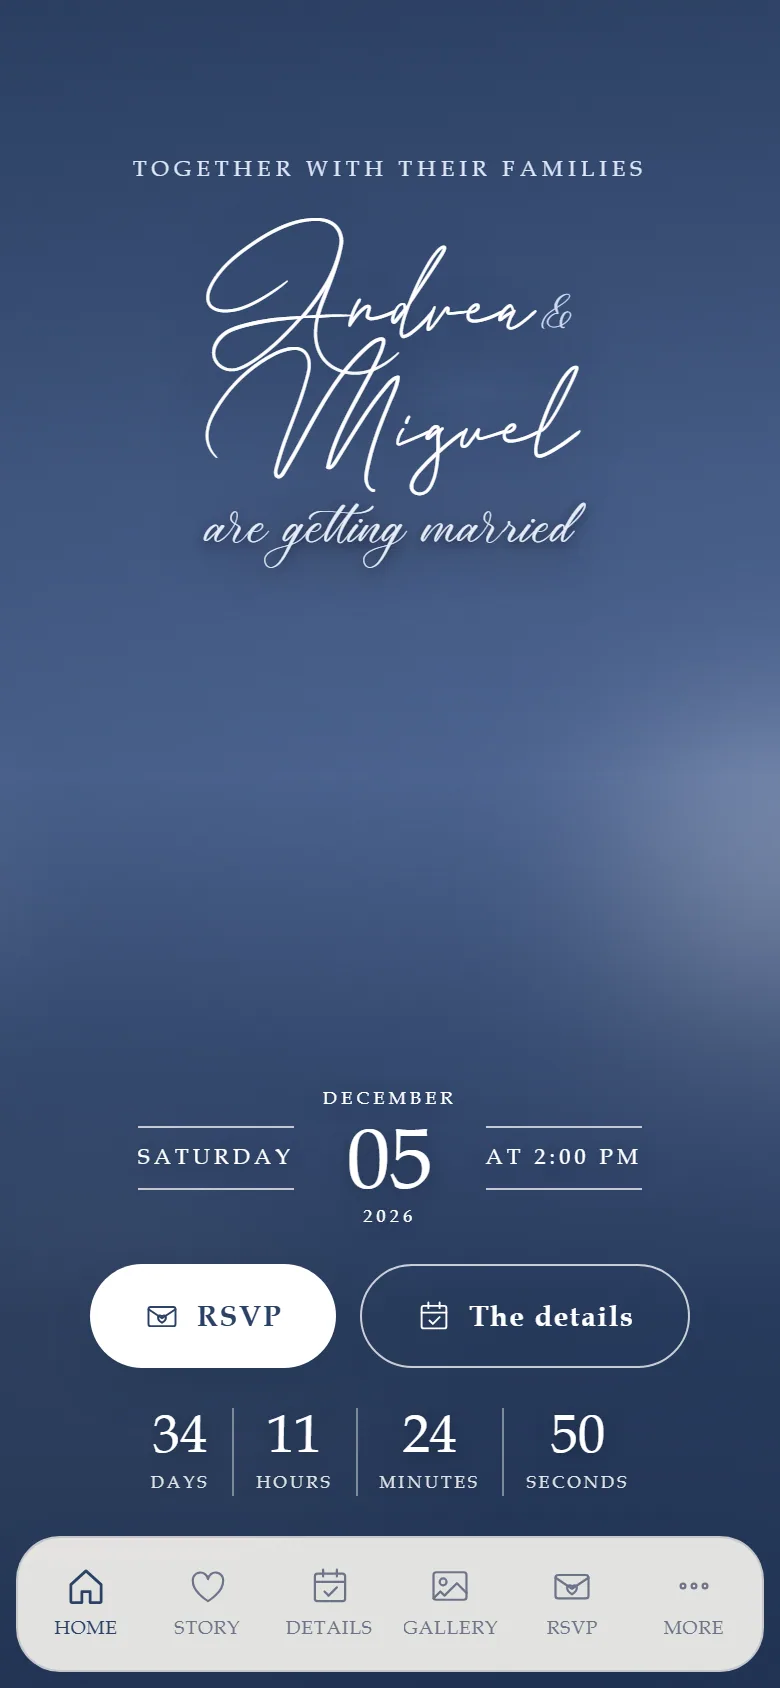
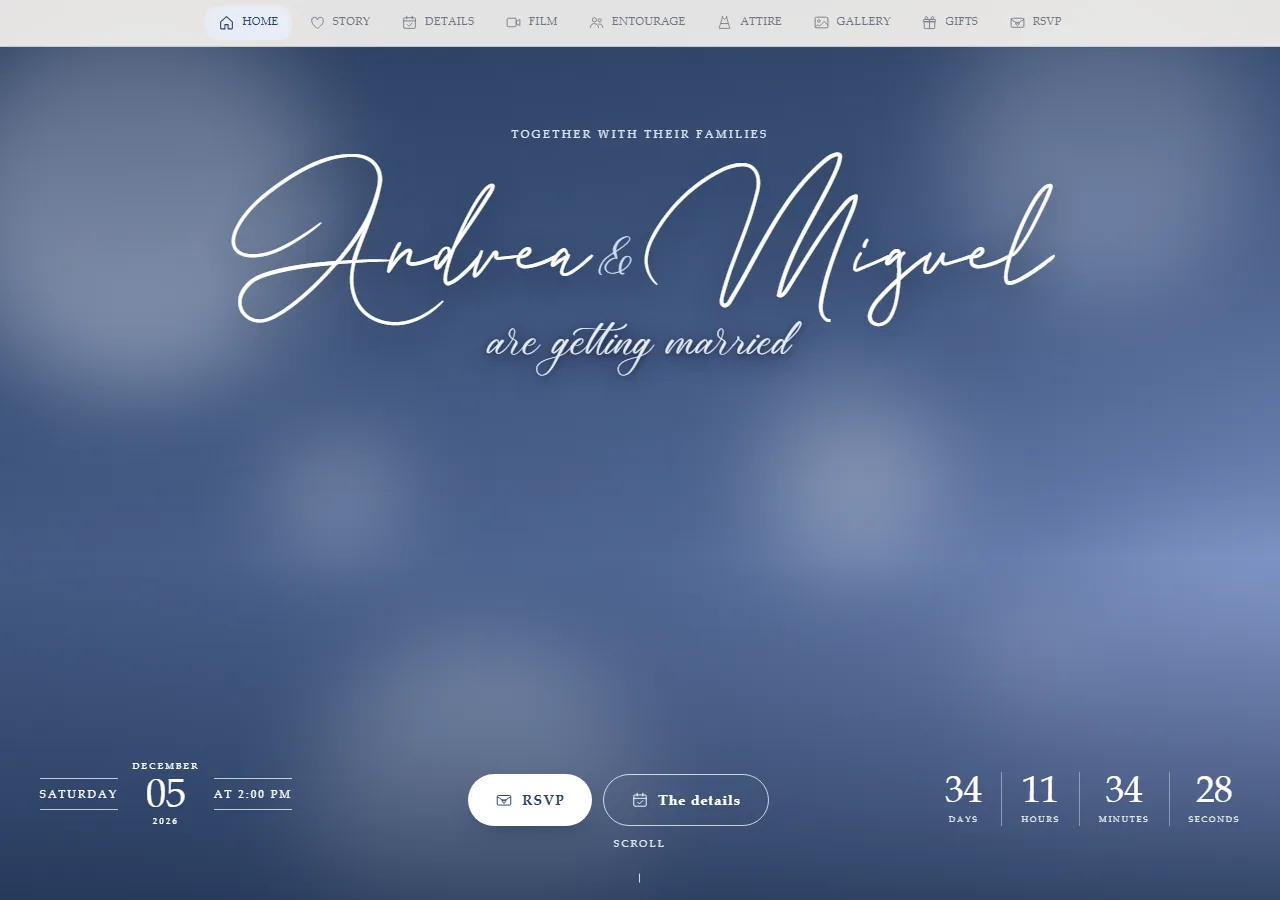
The link opens on a sealed envelope, your initials on the seal; the card inside carries your names and, on a personal link, a greeting to the guest by name. A tap on the seal opens it; the page unfolds — the names, the date and the countdown, the places with a map and a directions button, the people, the photos, the gifts, the reminders — and the shower of petals (or whatever you chose) drifts over it.

The reply
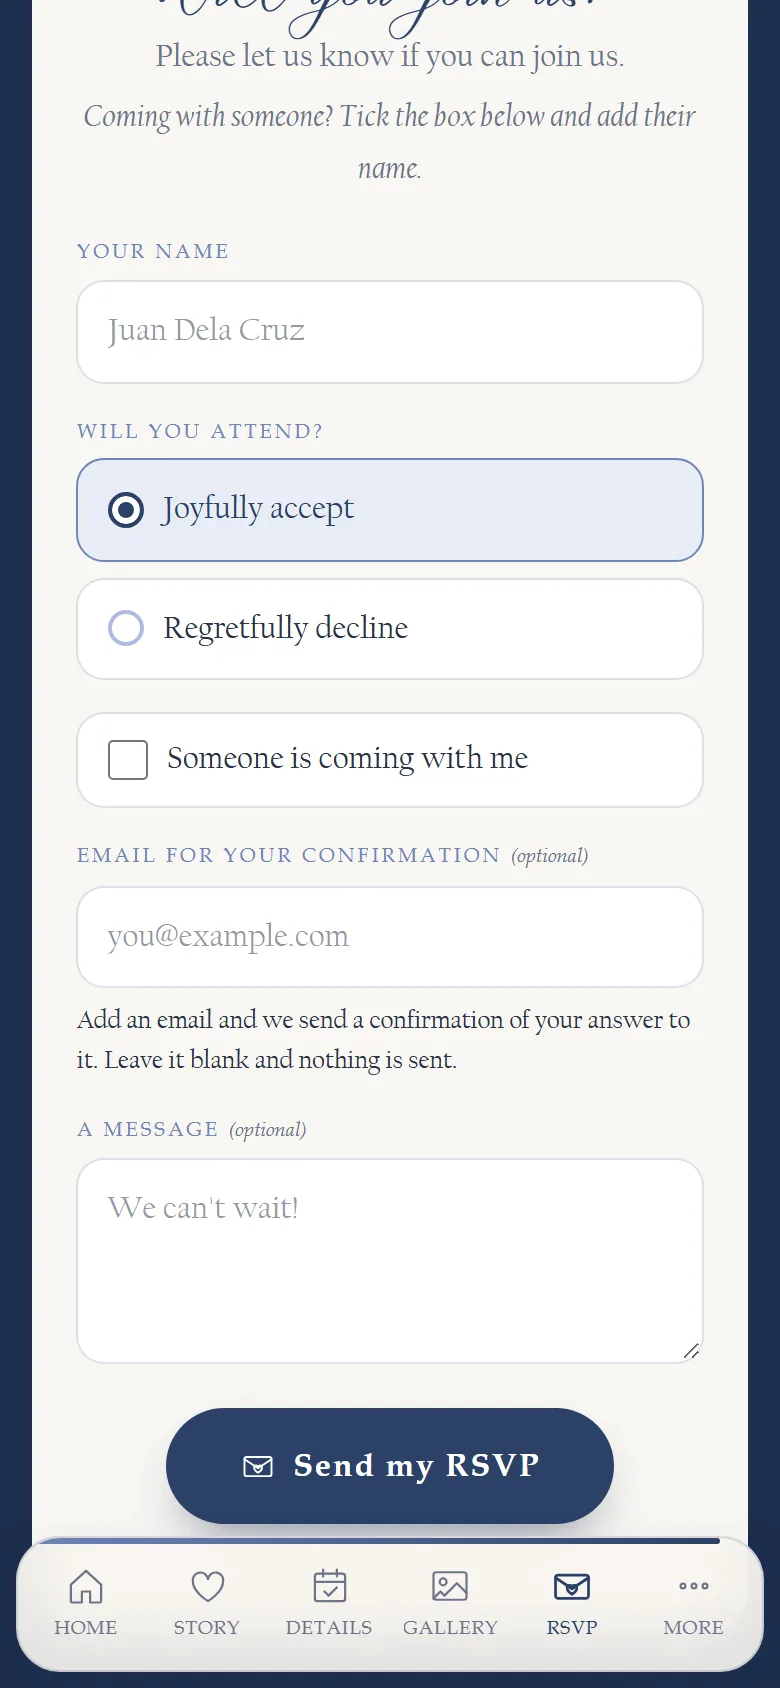
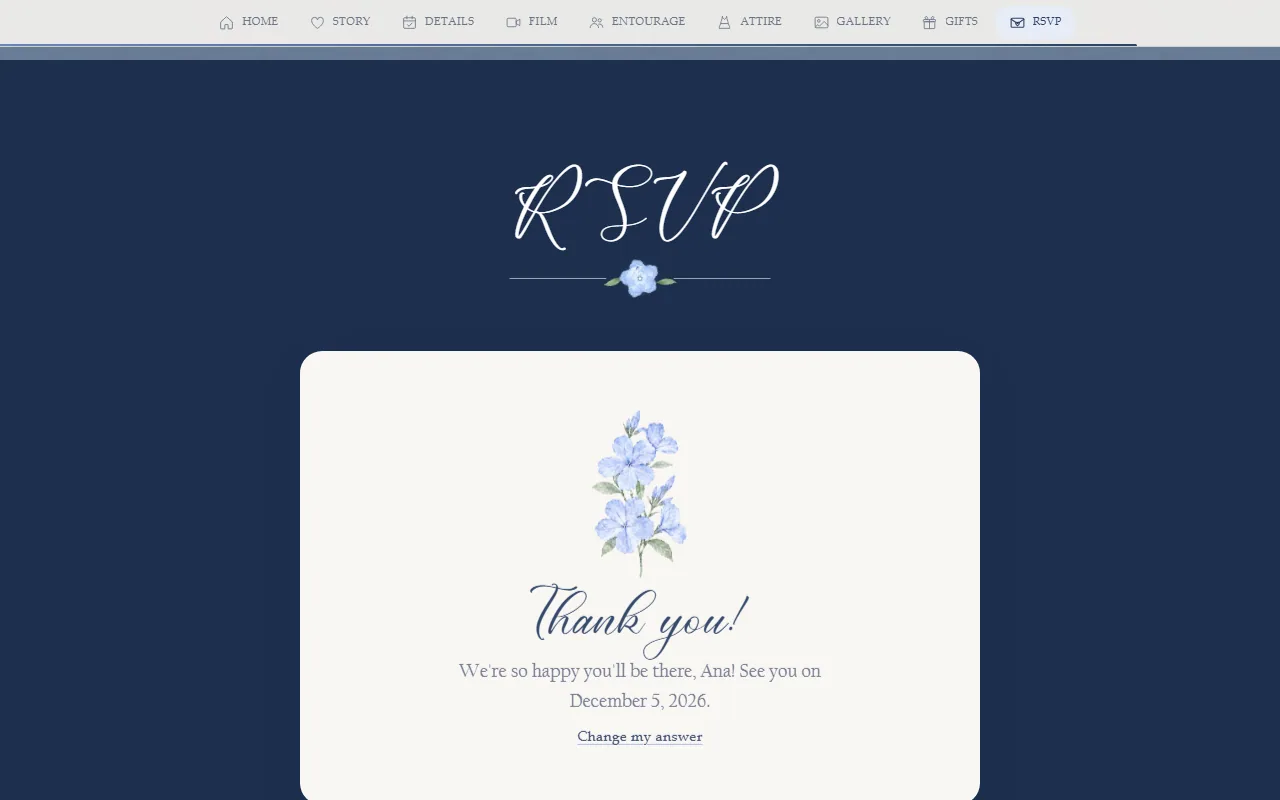
The reply form asks for the guest's name, whether they joyfully accept or regretfully decline, who is coming with them, your own questions if you added any, an email for their confirmation, and a message. A guest can come back and change my answer for as long as the invitation is live; the answer-by date you set is printed on the form as a request. To say who is coming with them a guest ticks Someone is coming with me, gives a name and an age for each person, and adds as many people as they need; there is no limit, and the seats on your Replies page follow the names.
Replies and guests
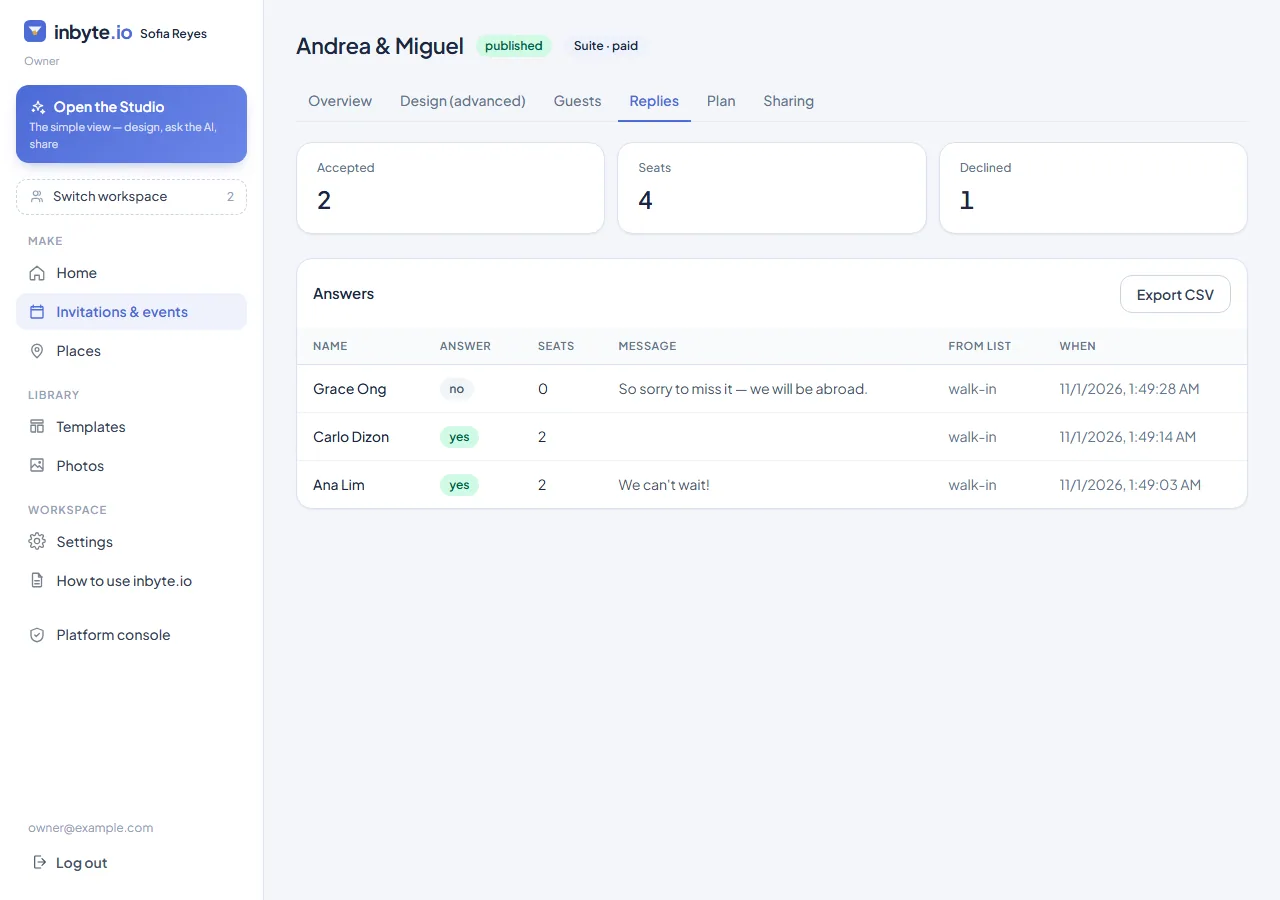
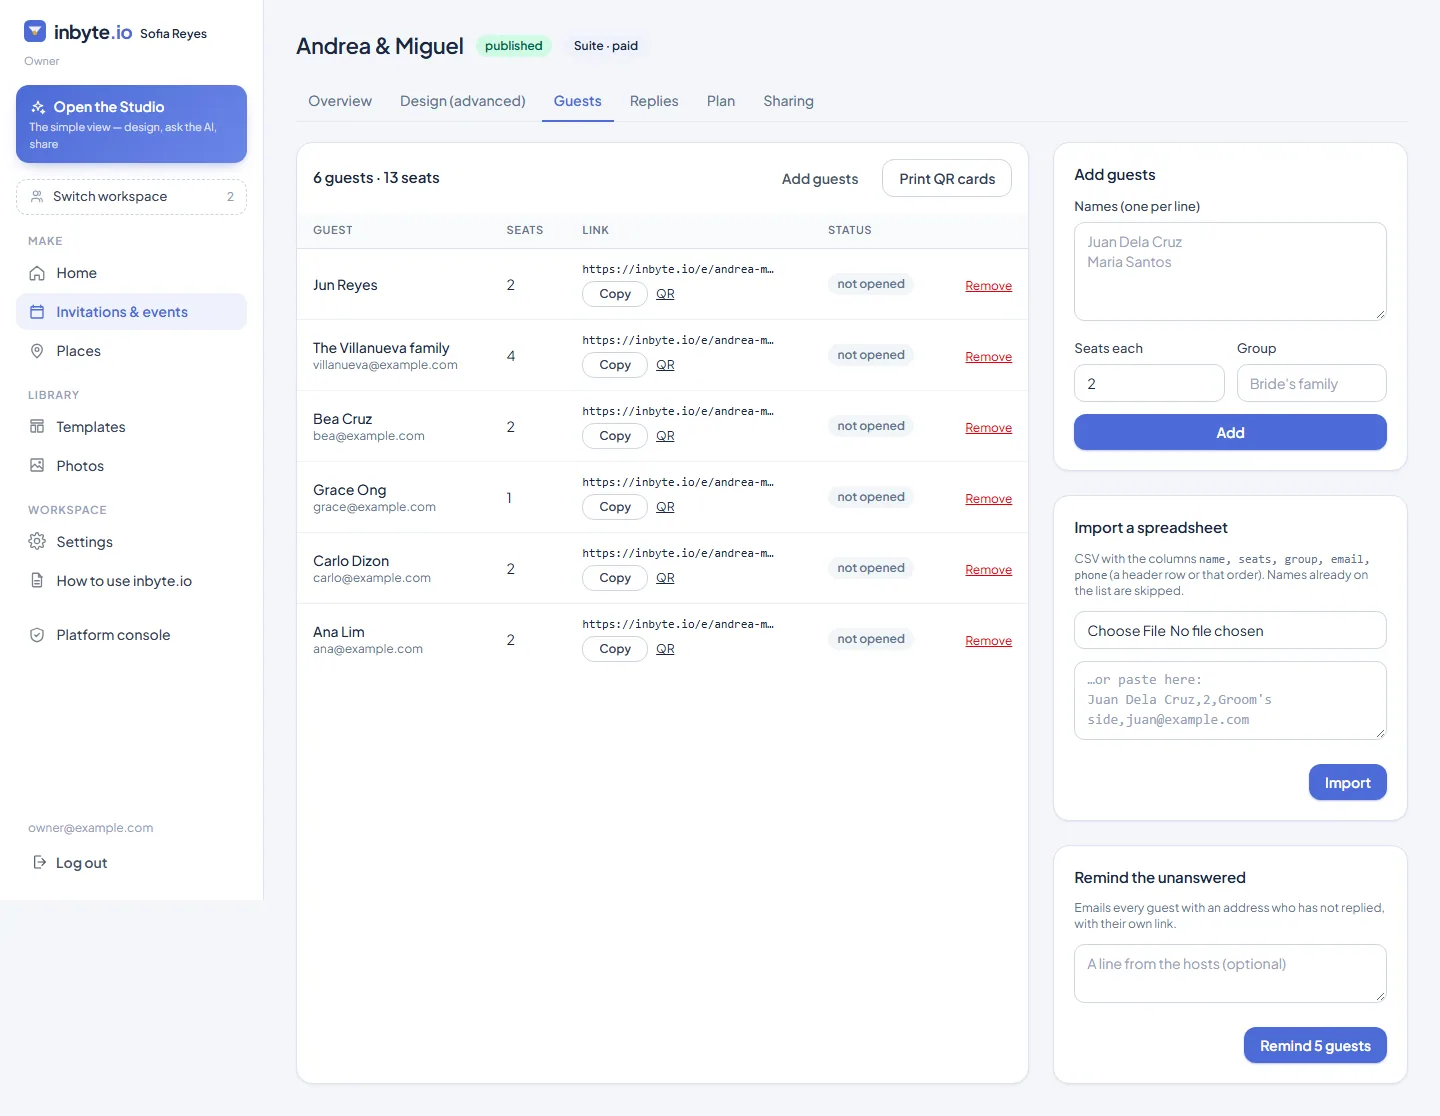
Replies (More → Replies, or the Replies tab of the full workspace) is who is coming, with their seats, the names and ages of those coming with them, their messages, and an export for the caterer. A reply can be deleted there too, after a confirmation: a test, a duplicate, or somebody who asked you to. Guests is your list: add names and seats, import a spreadsheet, and — on a plan with personal links — a link and QR code per guest with their name and seats already filled in, a reminder to the unanswered, and printable QR cards.
Chapter 7
Working together
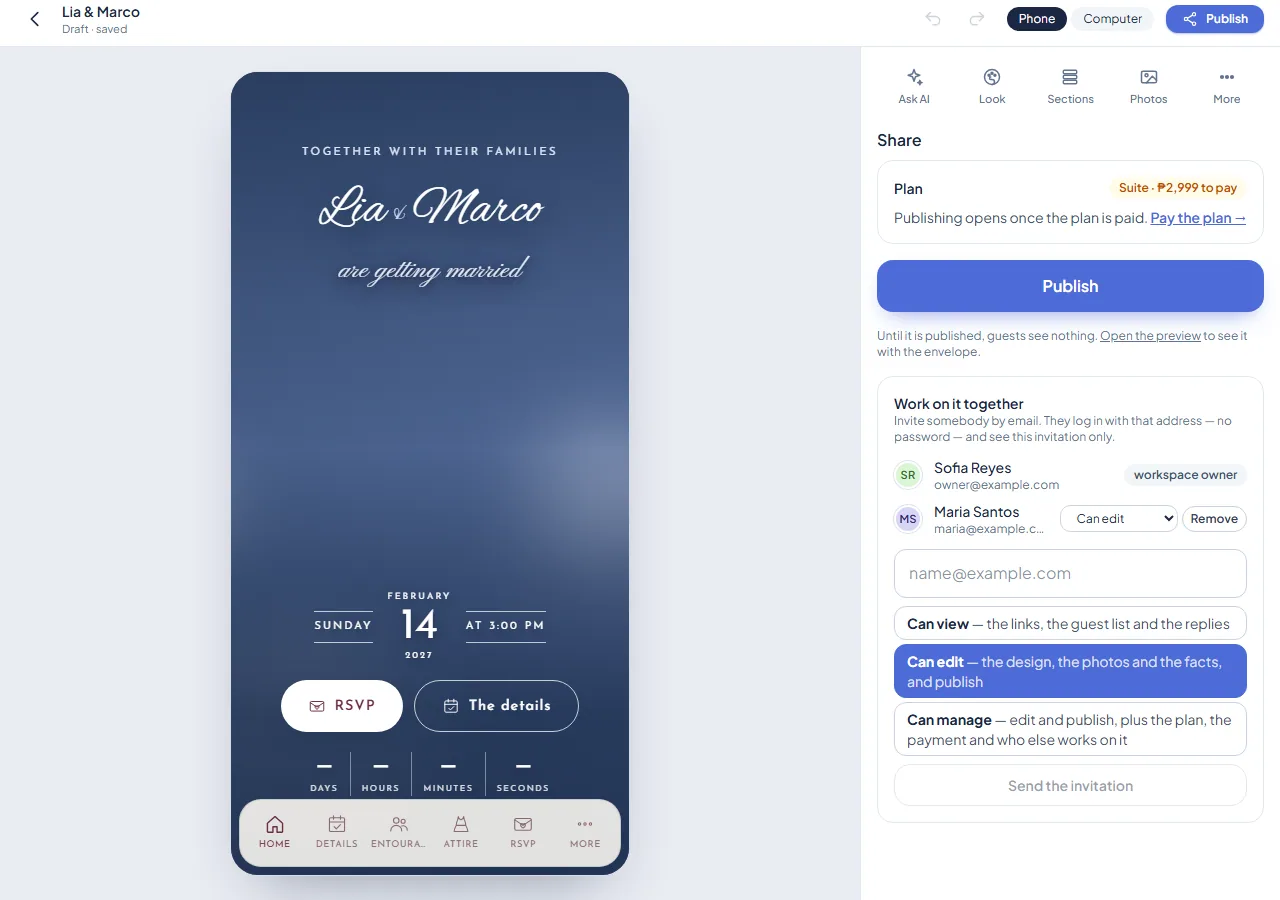
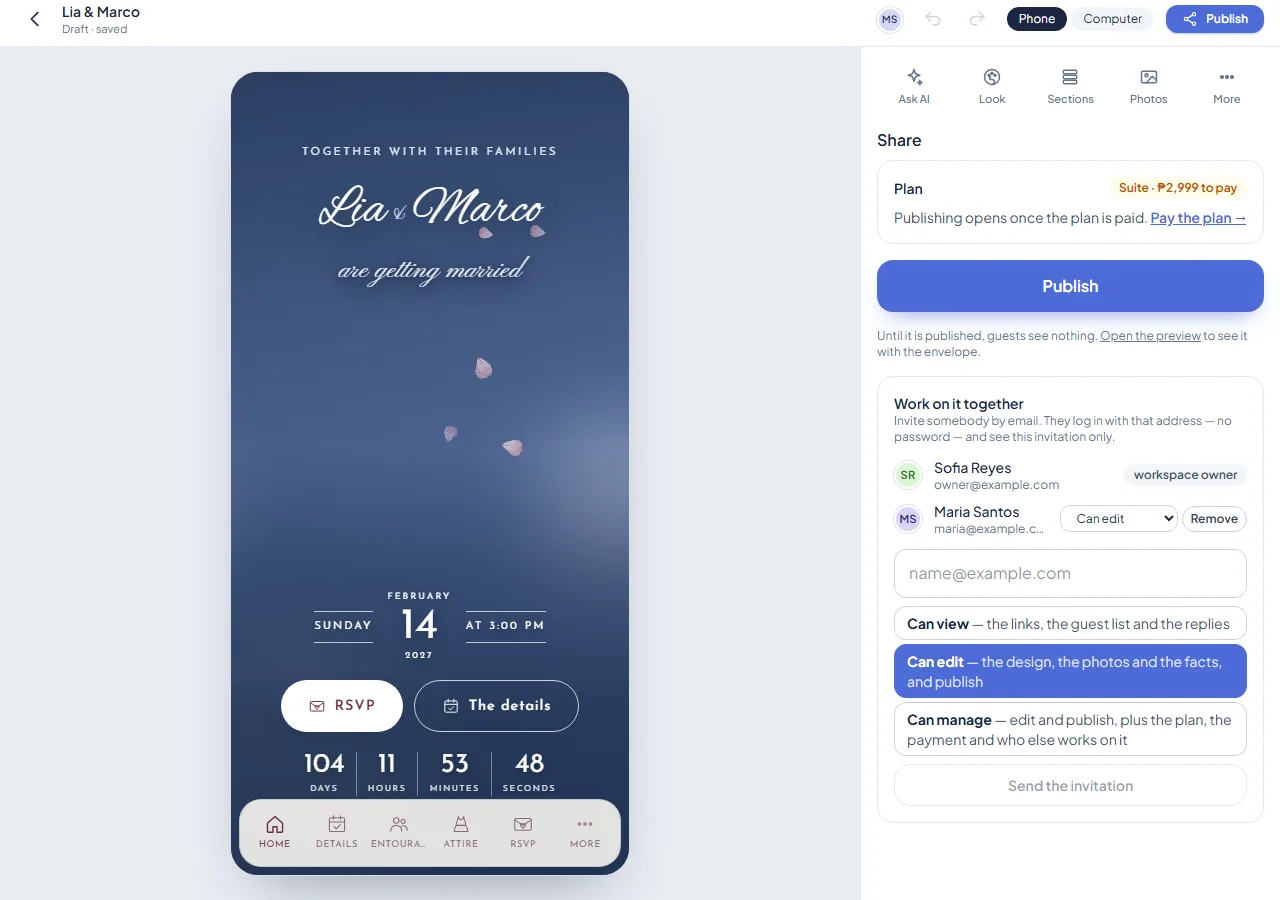
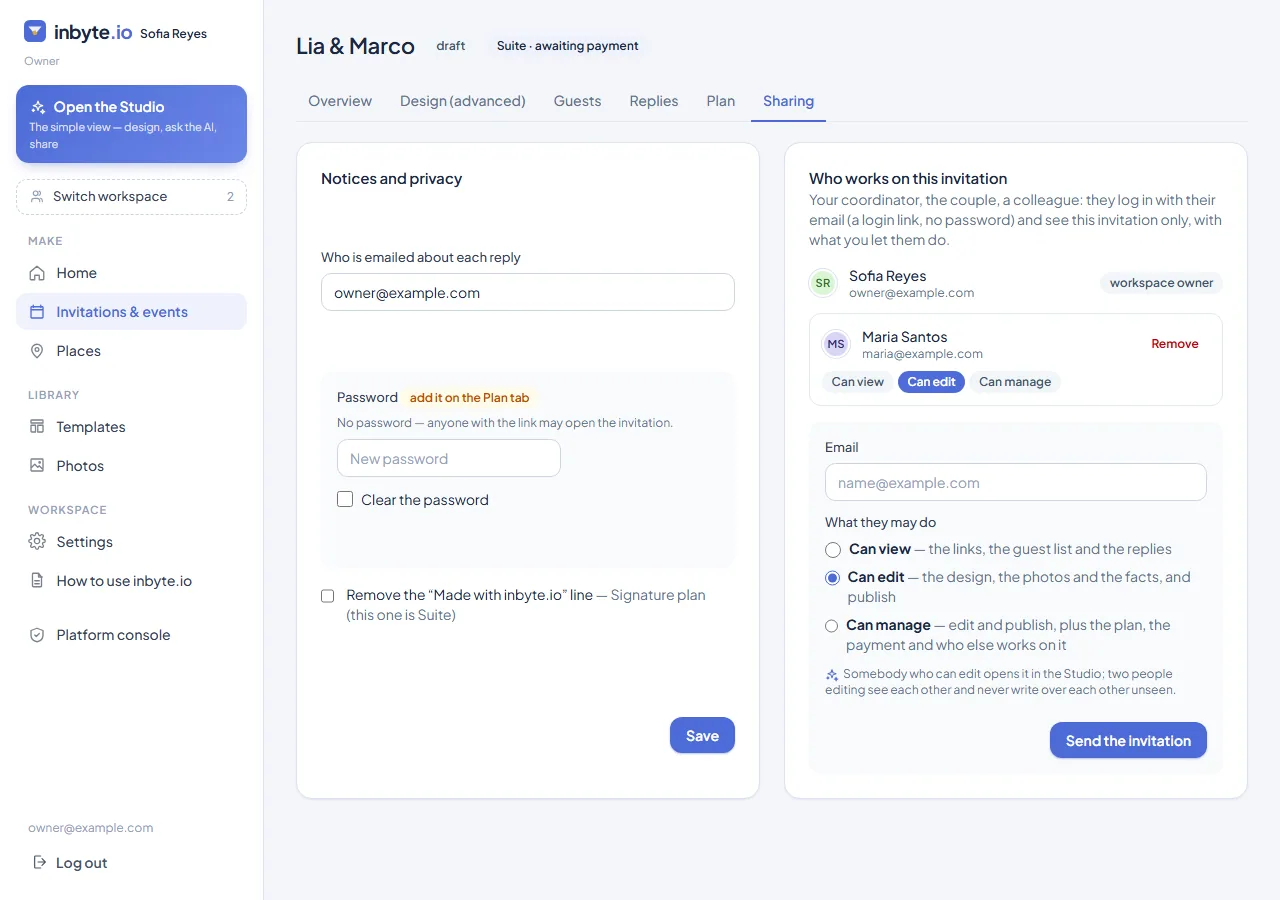
An invitation is rarely one person's work. From Share (or the Sharing tab in the full workspace), whoever manages the invitation invites somebody by email and says what they may do. The invited person signs in with that address — no password — and finds the invitation on their own home (somebody who may only view lands straight on its Overview in the full workspace).
- Can view — the links, the guest list and the replies.
- Can edit — the design, the photos and the facts, and publish.
- Can manage — edit and publish, plus the plan, the payment and who else works on it.
The same place changes what somebody may do, or takes it back; an invitation not yet accepted can be withdrawn. Somebody with a seat in more than one workspace chooses where they are acting from the switcher at the top of the workspace.
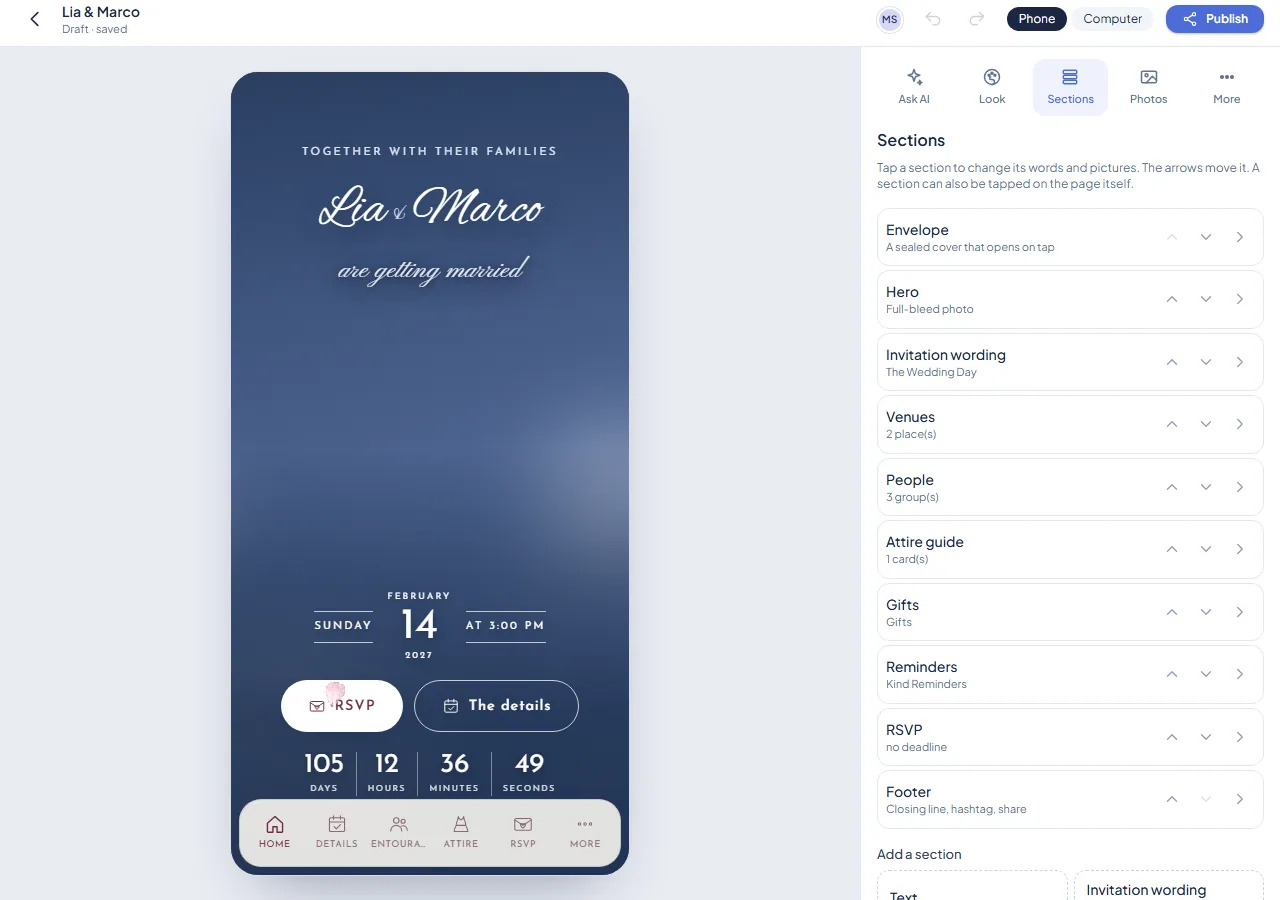
Two people can have the Studio open at once. A change saved by one appears for the other within moments. If both change the same draft before either saves, the second to save is told that a newer version was saved while they were editing, and chooses: Load theirs (their own unsaved edits are lost) or Keep mine (the other version is written over).
Chapter 8
Plans and payments
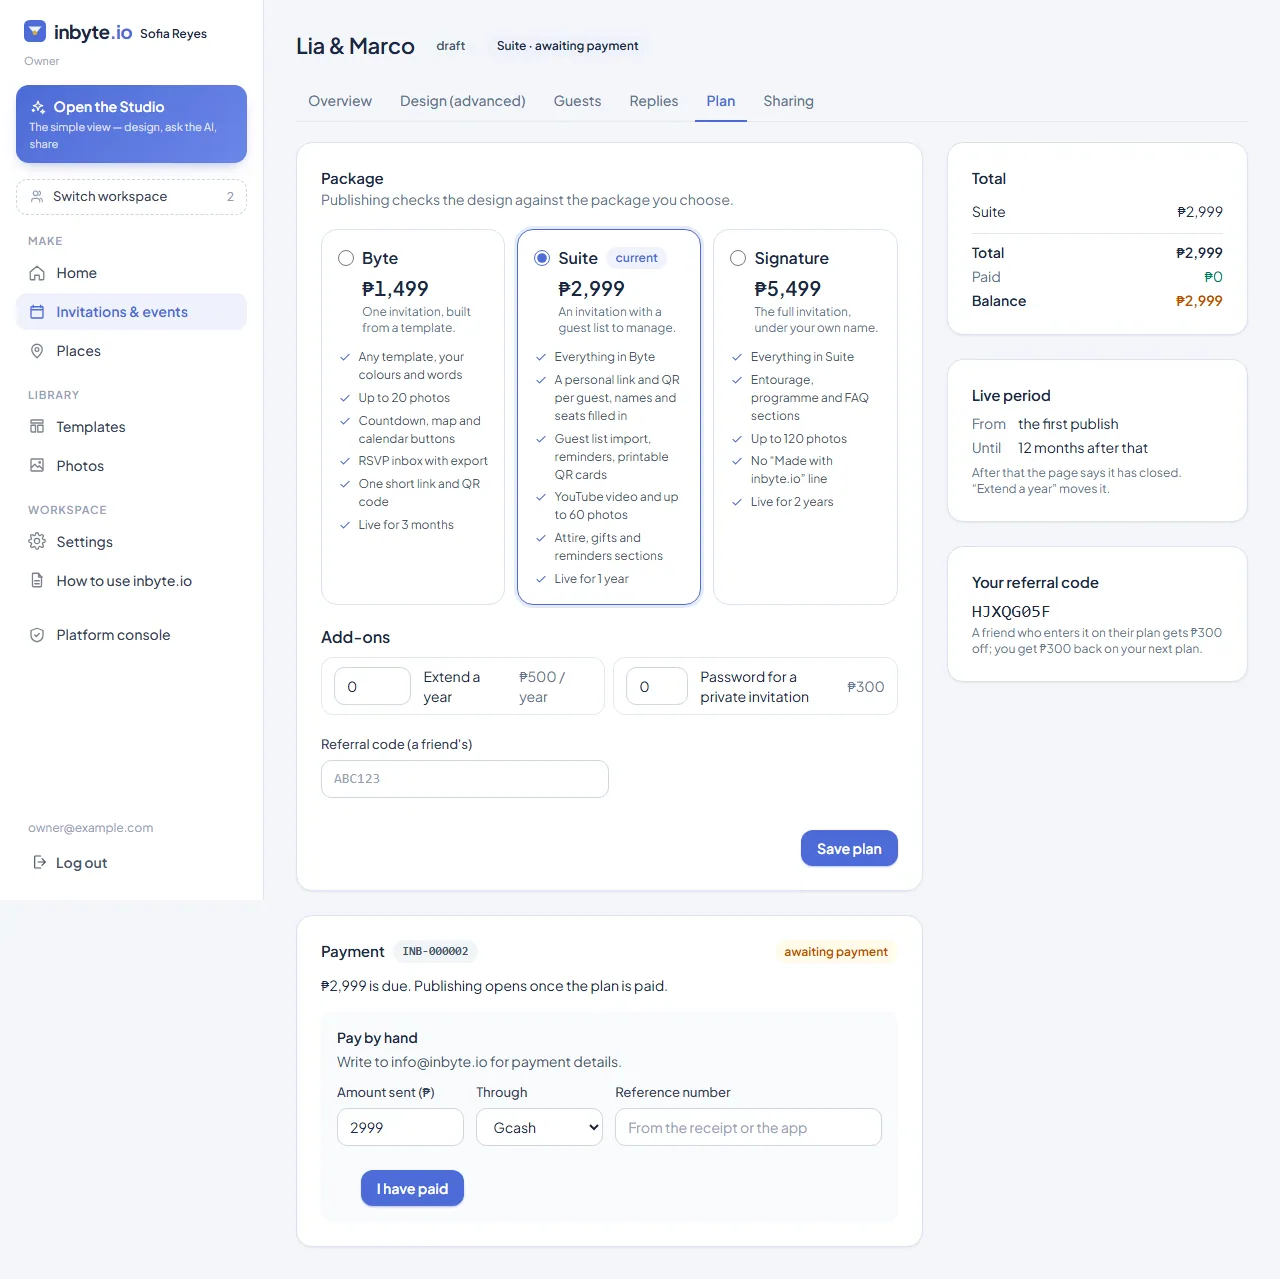
An invitation is free to design. You choose and pay a plan when you are ready to publish, under More → Plan & payment (the Plan tab in the full workspace). The plan decides how long the page stays live, how many photos it carries, and which sections it may use. A plan already bought keeps the prices it was bought at.
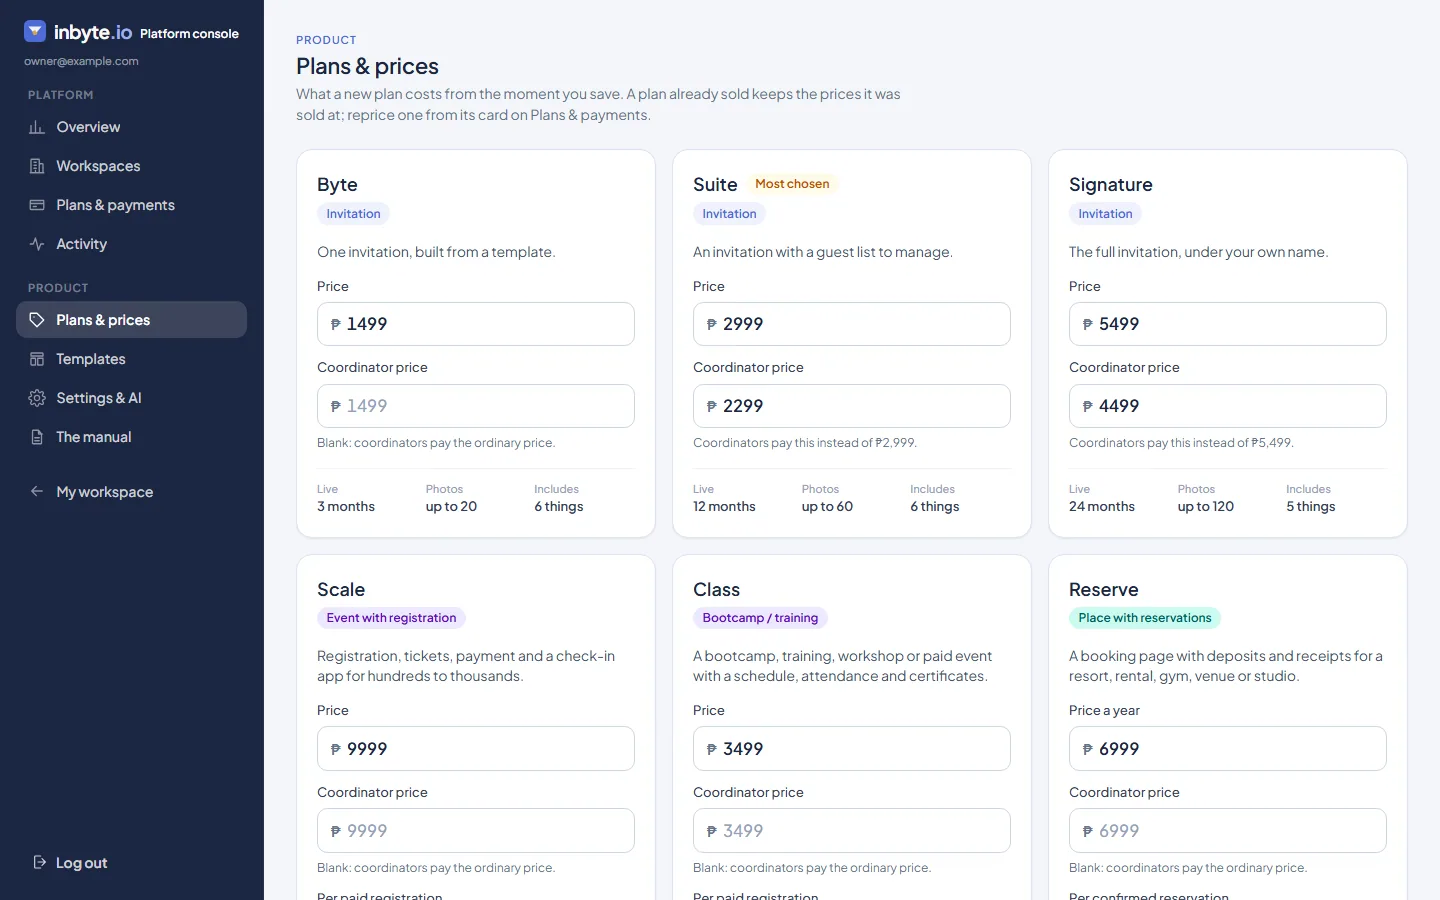
| Plan | For | Price | Live for |
|---|---|---|---|
| Byte | One invitation, built from a template. | ₱1,499 | 3 months |
| Suite | An invitation with a guest list to manage. | ₱2,999 | 12 months |
| Signature | The full invitation, under your own name. | ₱5,499 | 24 months |
| Scale | Registration, tickets, payment and a check-in app for hundreds to thousands. | ₱9,999 + ₱15 per paid registration | 6 months |
| Class | A bootcamp, training, workshop or paid event with a schedule, attendance and certificates. | ₱3,499 + ₱20 per paid registration | 6 months |
| Reserve | A booking page with deposits and receipts for a resort, rental, gym, venue or studio. | ₱6,999 + ₱20 per confirmed reservation | 12 months |
Add-ons: Extend a year — ₱500 a year; Password for a private invitation — ₱300. Prices in Philippine pesos, as listed today.
Pay by hand — a GCash, Maya or bank transfer following the instructions on the page, after which you report the amount, the method and the reference number from your receipt on the same page. A payment made by hand is confirmed by the platform, and the plan shows as paid once it is. Publishing opens the moment the plan is paid.
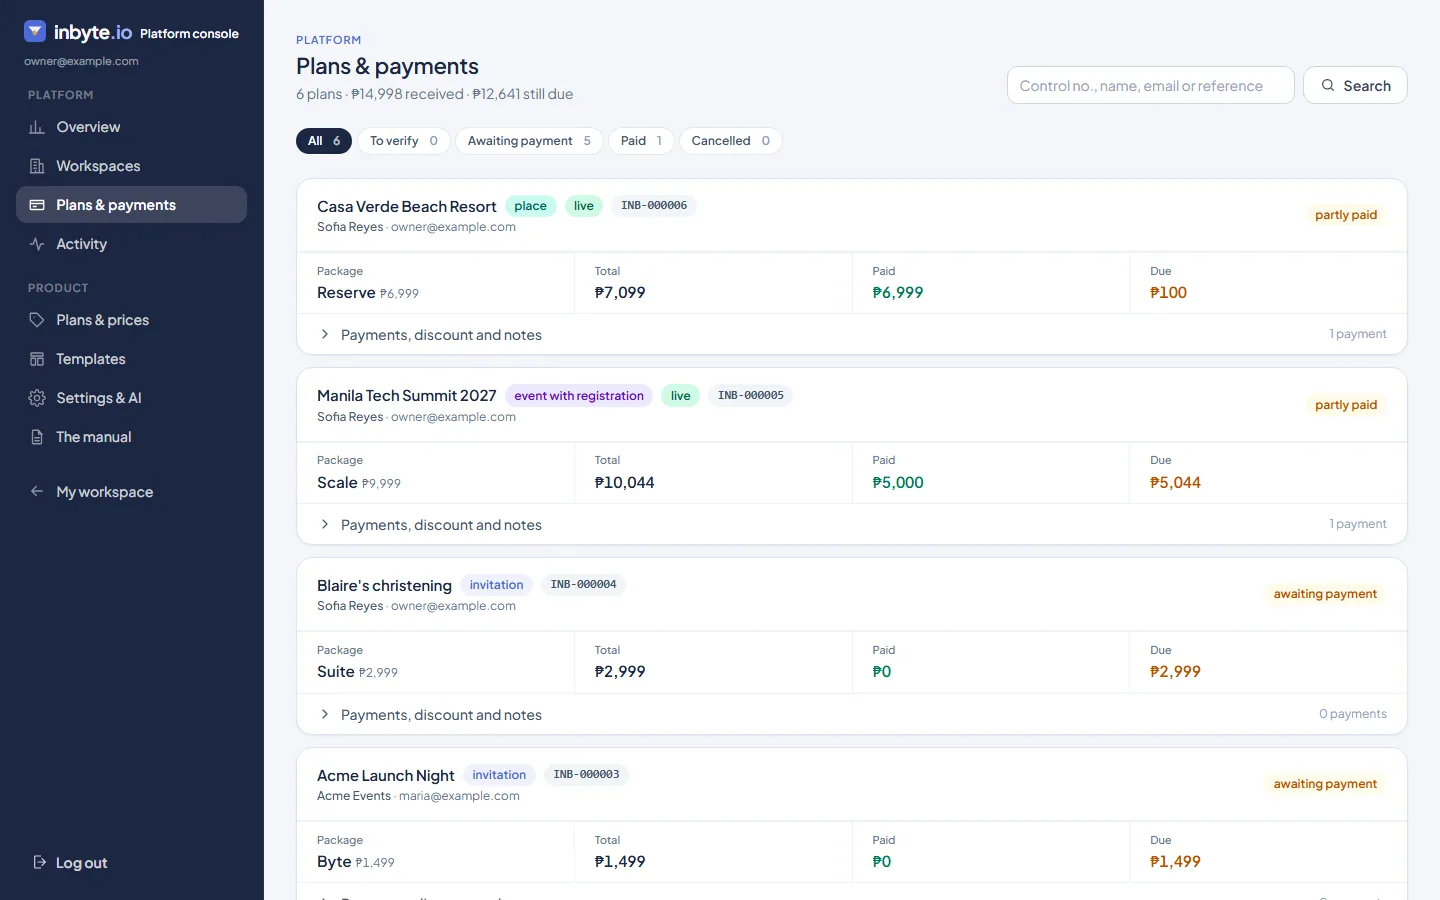
Every transaction carries a control number — INB-000123 — the plan itself and each payment on it, and likewise a registration, a reservation and its receipts. It is printed on the Plan page beside the payment, on tickets and receipts, on the Participants and Reservations lists and their spreadsheets, and in the emails. Quote it whenever you write to the platform about a payment; those two lists can also be searched by it.
Chapter 9
The full workspace
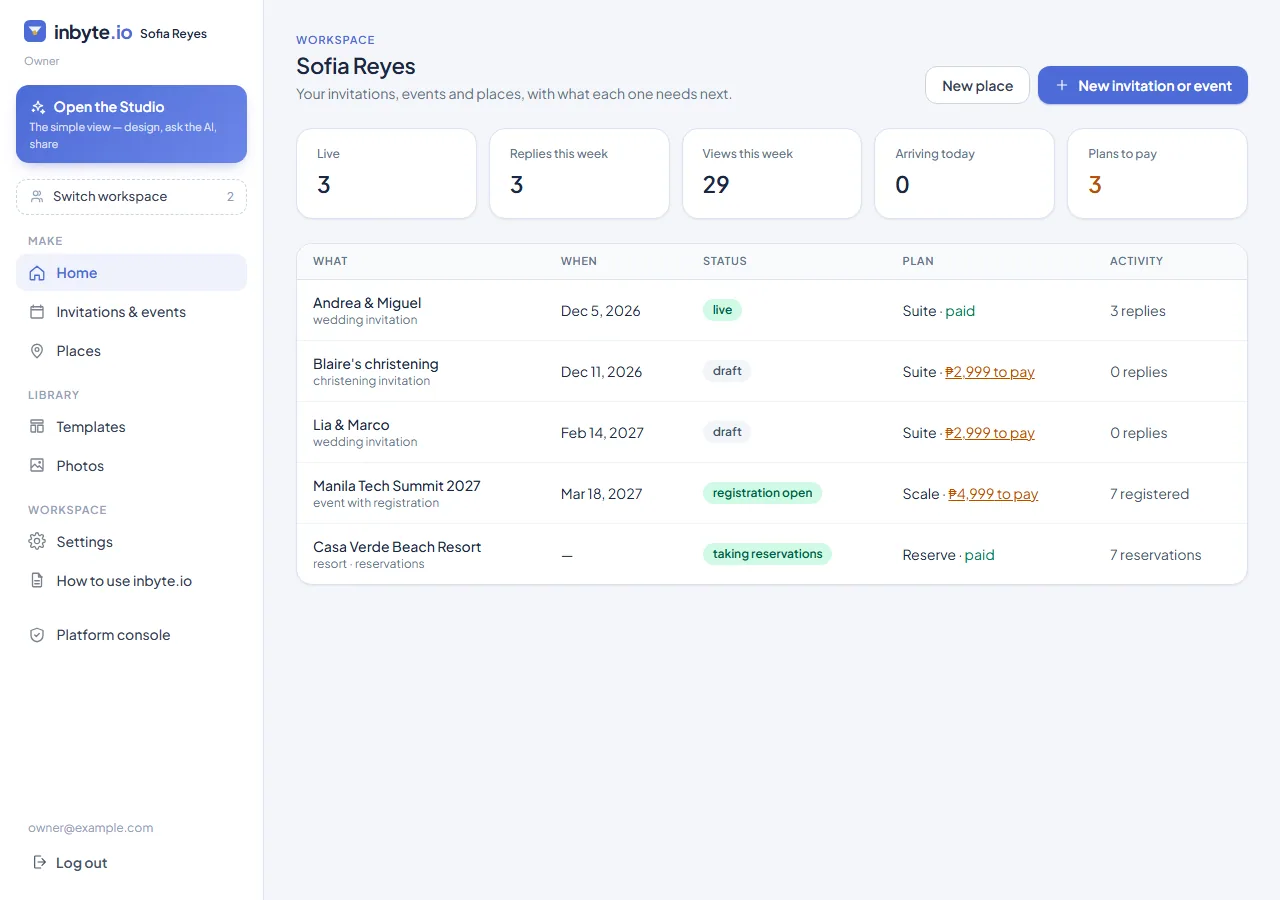
The Studio is the short road. Behind it is the full workspace — More → The full workspace, or the /admin address — with everything the workspace holds: every invitation, event and place, the photo library, the templates, the settings. Its sidebar: Home, Invitations & events, Places, Templates, Photos and Settings (a coordinator's workspace also has Clients).
An invitation's tabs
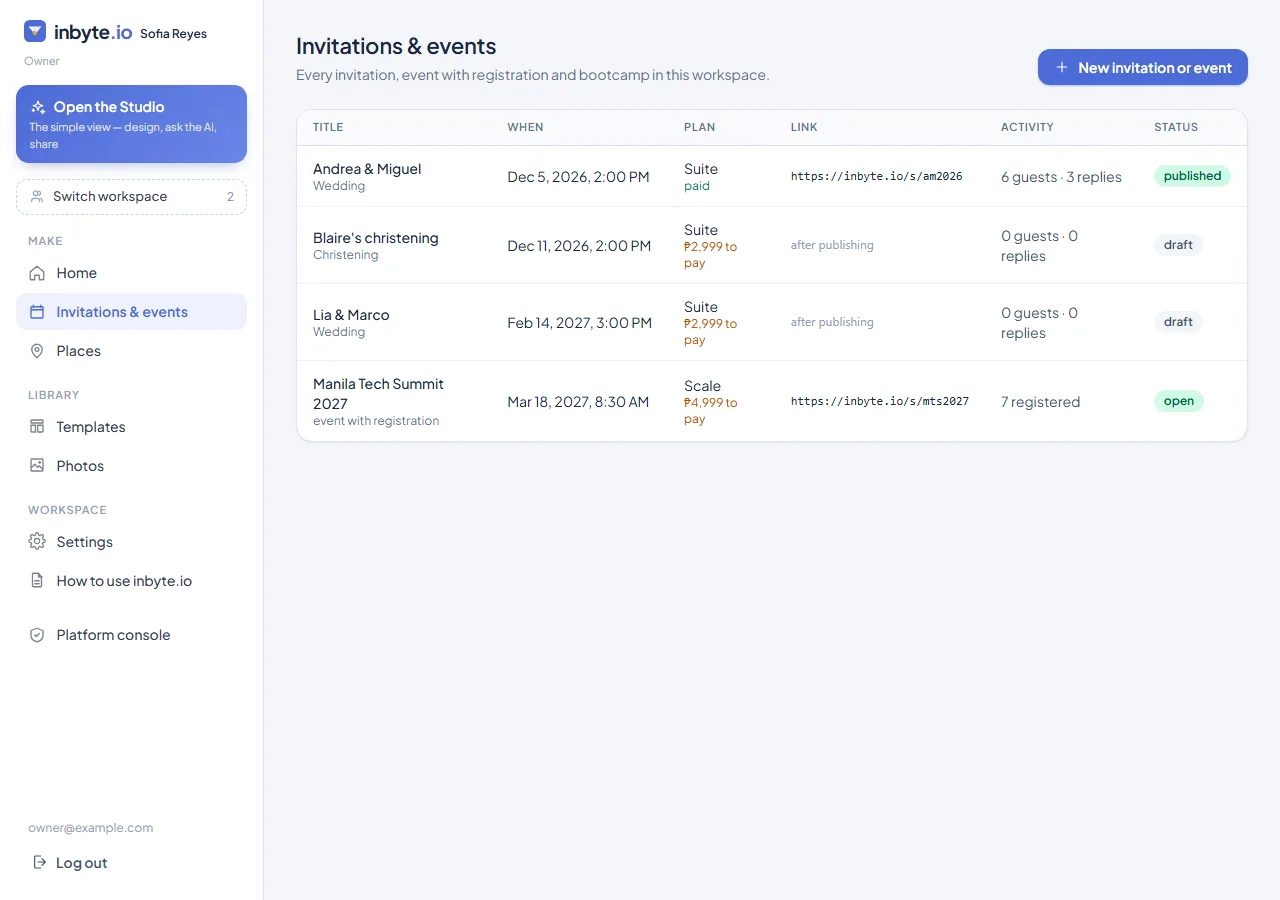
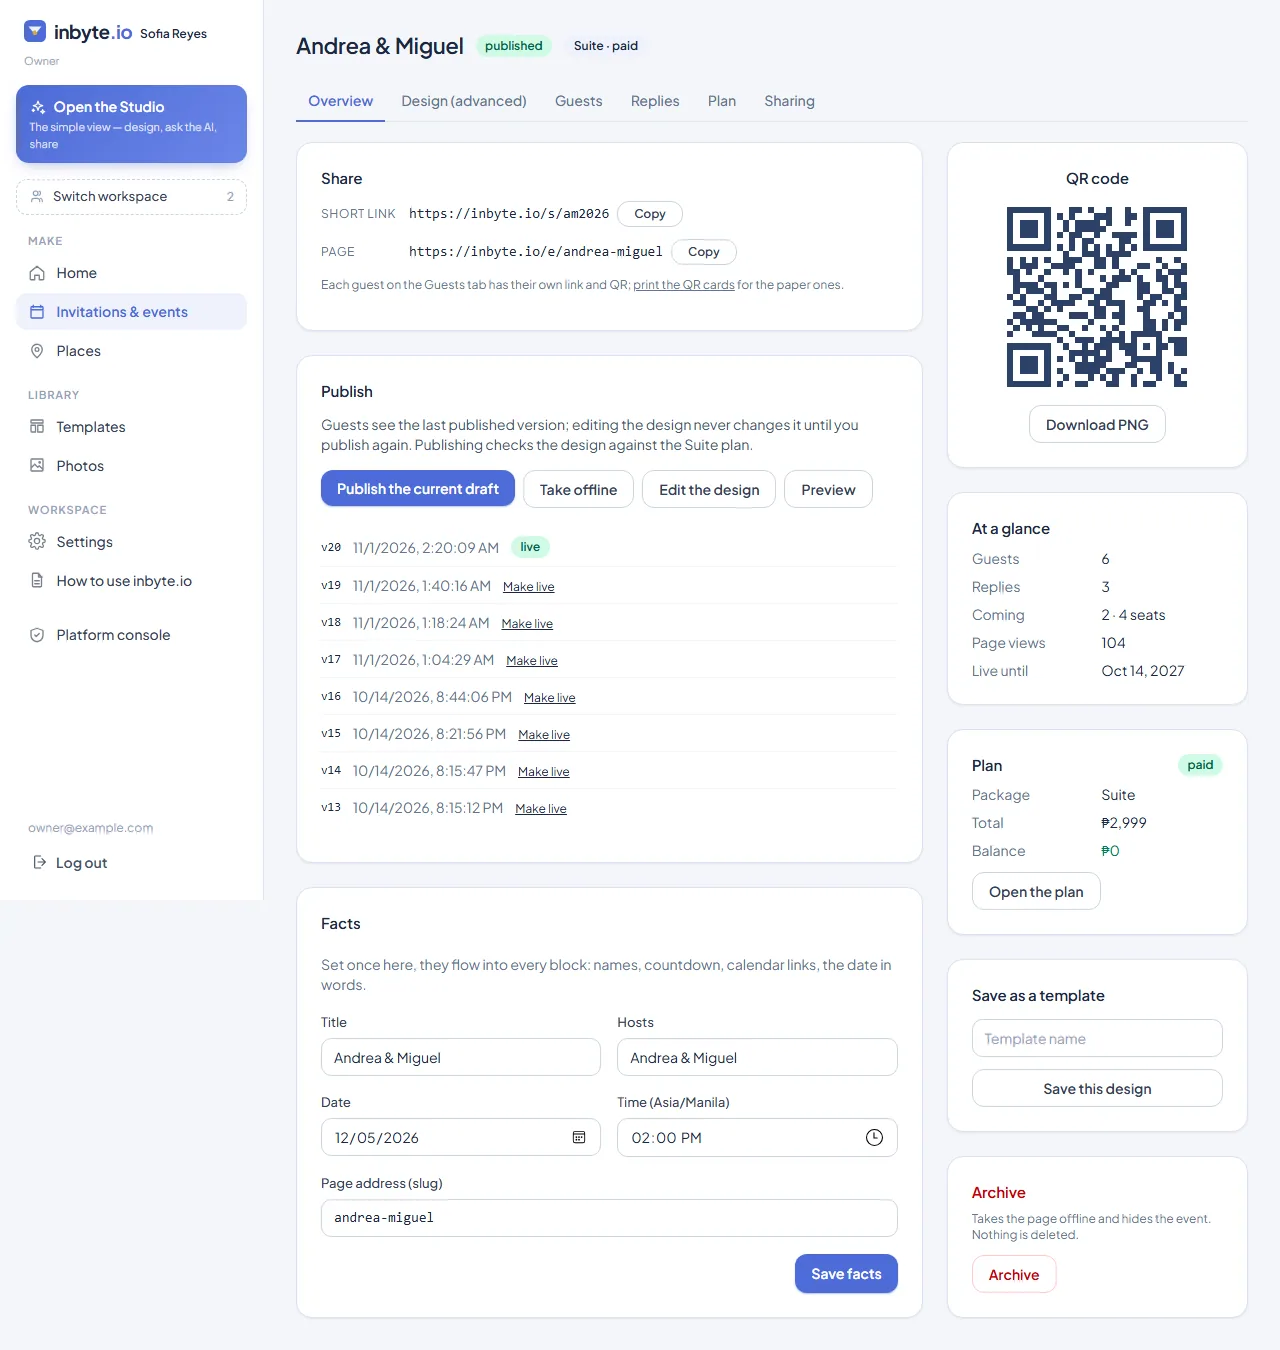
Open an invitation from Invitations & events and it has tabs: Overview (the facts, the plan, the link and the numbers), Design (advanced), Guests, Replies, Plan and Sharing.
The advanced editor
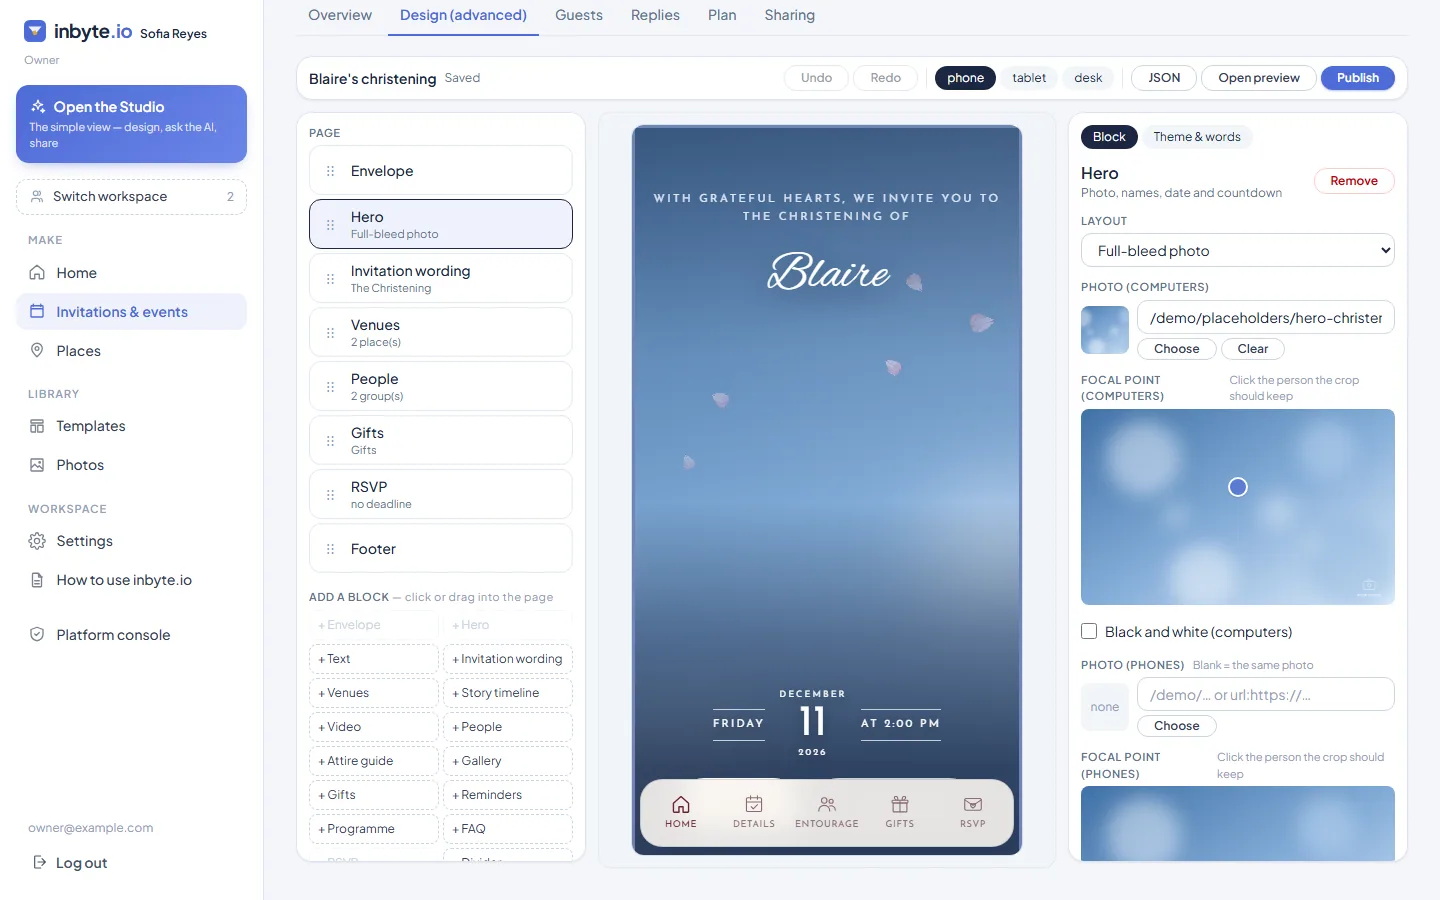
Every field of every section, on a computer: the sections on the left with handles to drag them into order and a button to add more, the page in the middle at phone, tablet or desk width, and on the right the fields of the selected section — or, under Theme & words, the colours, the fonts, the background elements, the shower elements, the background texture (including a picture of your own) and the words every section reads. On a narrower screen the sections sit behind a Sections button beside the page. Undo, Redo and Publish are at the top. The Studio and the advanced editor edit the same draft, so you can switch between them at any time.
Events with registration, and courses
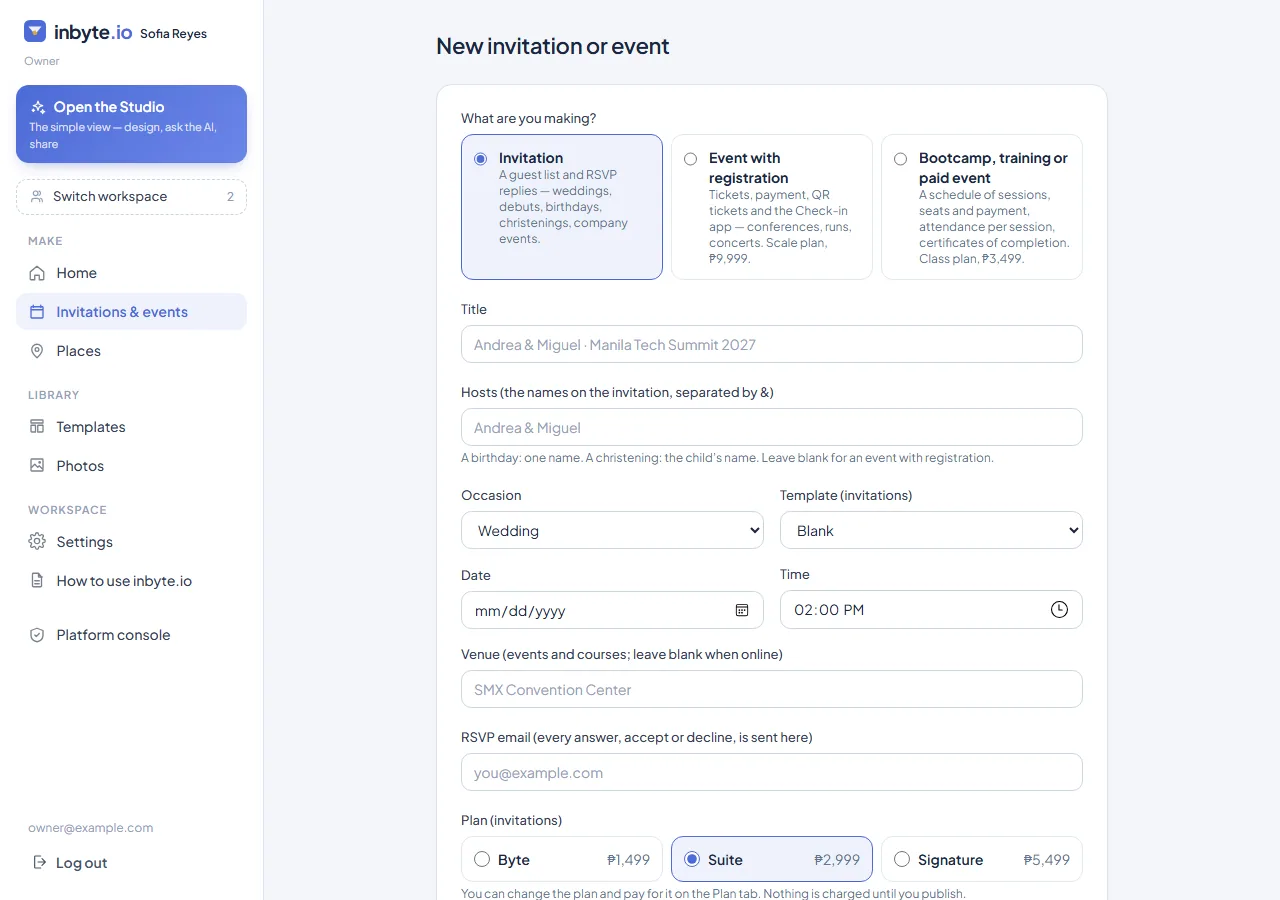
From New invitation or event on Invitations & events you can also make an event with registration — a page where people register themselves, choose a ticket type, pay, and receive a QR ticket — or a bootcamp, training or paid event (a course, in this manual): a schedule of sessions, attendance per session and certificates. Their tabs are Overview, Tickets (for a course, Schedule & seats), Participants, Check-in (Attendance), Plan and Sharing.
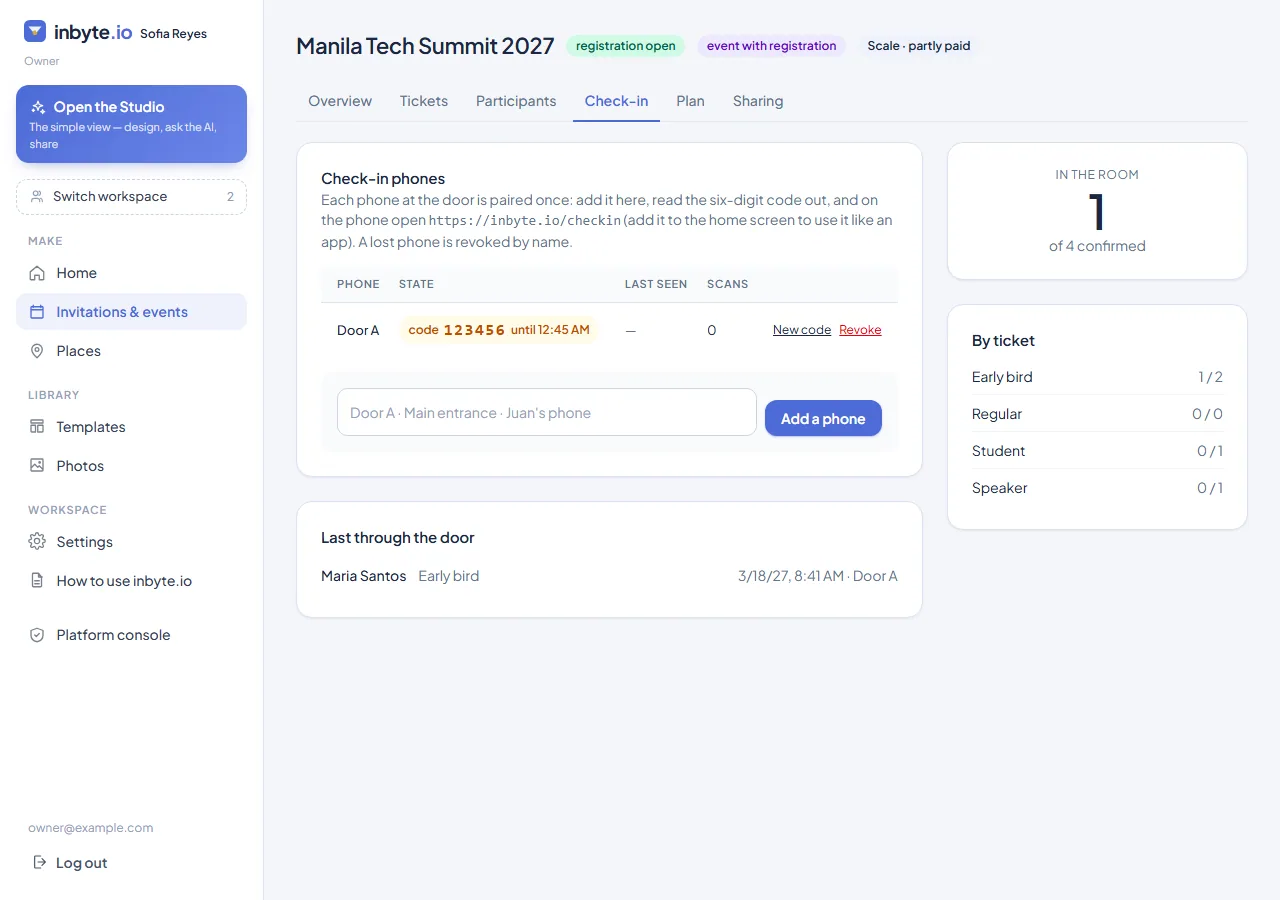
Check-in pairs the phones at the door: add a phone here, read out its six-digit code, and on the phone open /checkin and enter it. Each phone scans tickets; the page shows who was last through the door and the count by ticket type.
Places
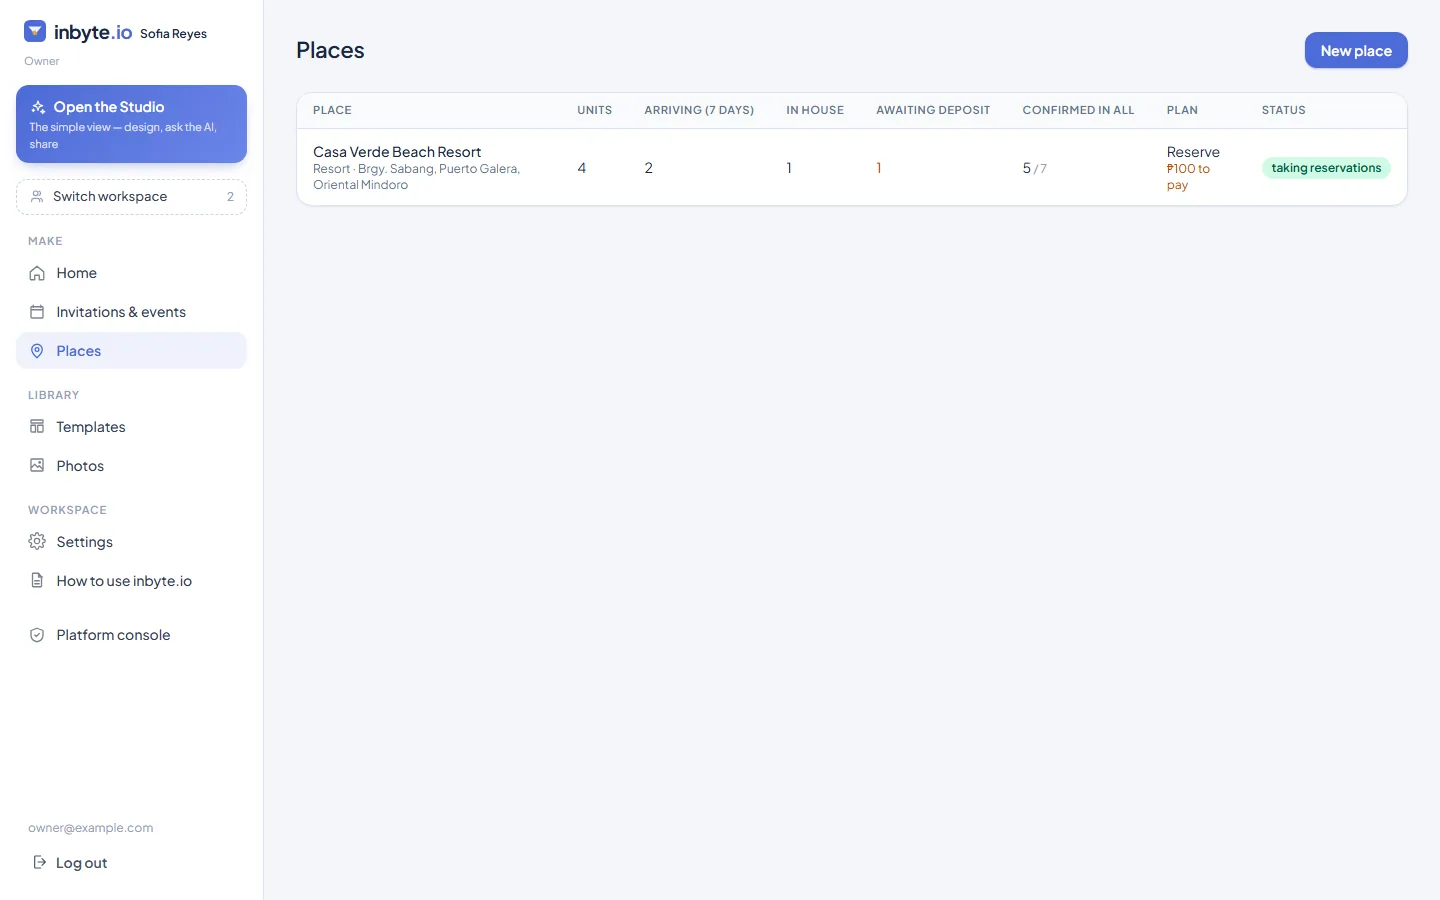
A place — a resort, a rental, a gym, a venue, a studio — gets a booking page of its own: units by the night, the day or the session, with capacity, quantity and a minimum stay; live availability, so the page never offers a taken unit; a deposit rule that confirms a reservation; payment by hand; and a numbered acknowledgement receipt. Its tabs are Overview, Setup, Reservations, Calendar, Check-in and Order. On the Calendar, press a booked day to see who holds it.
Photos, templates, settings
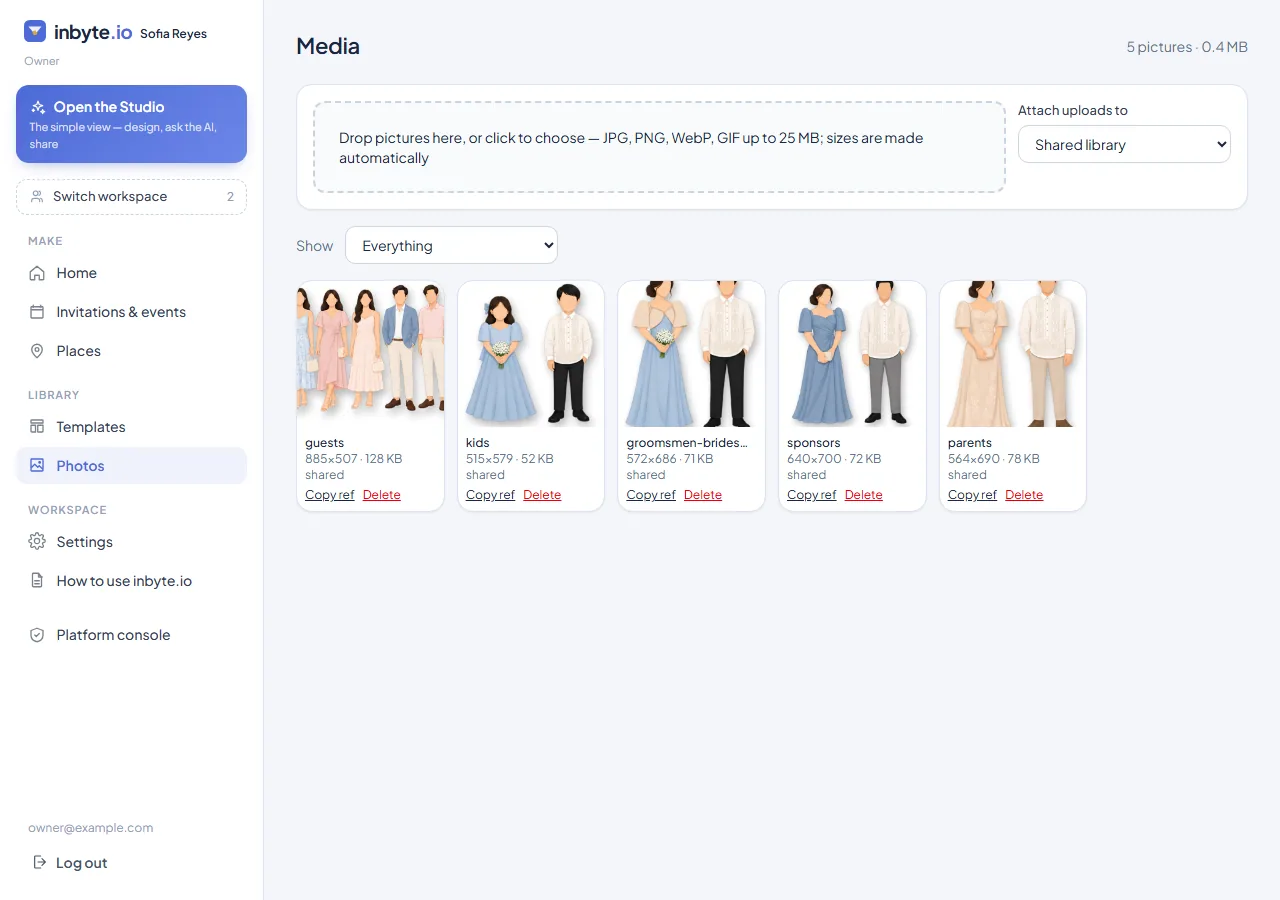
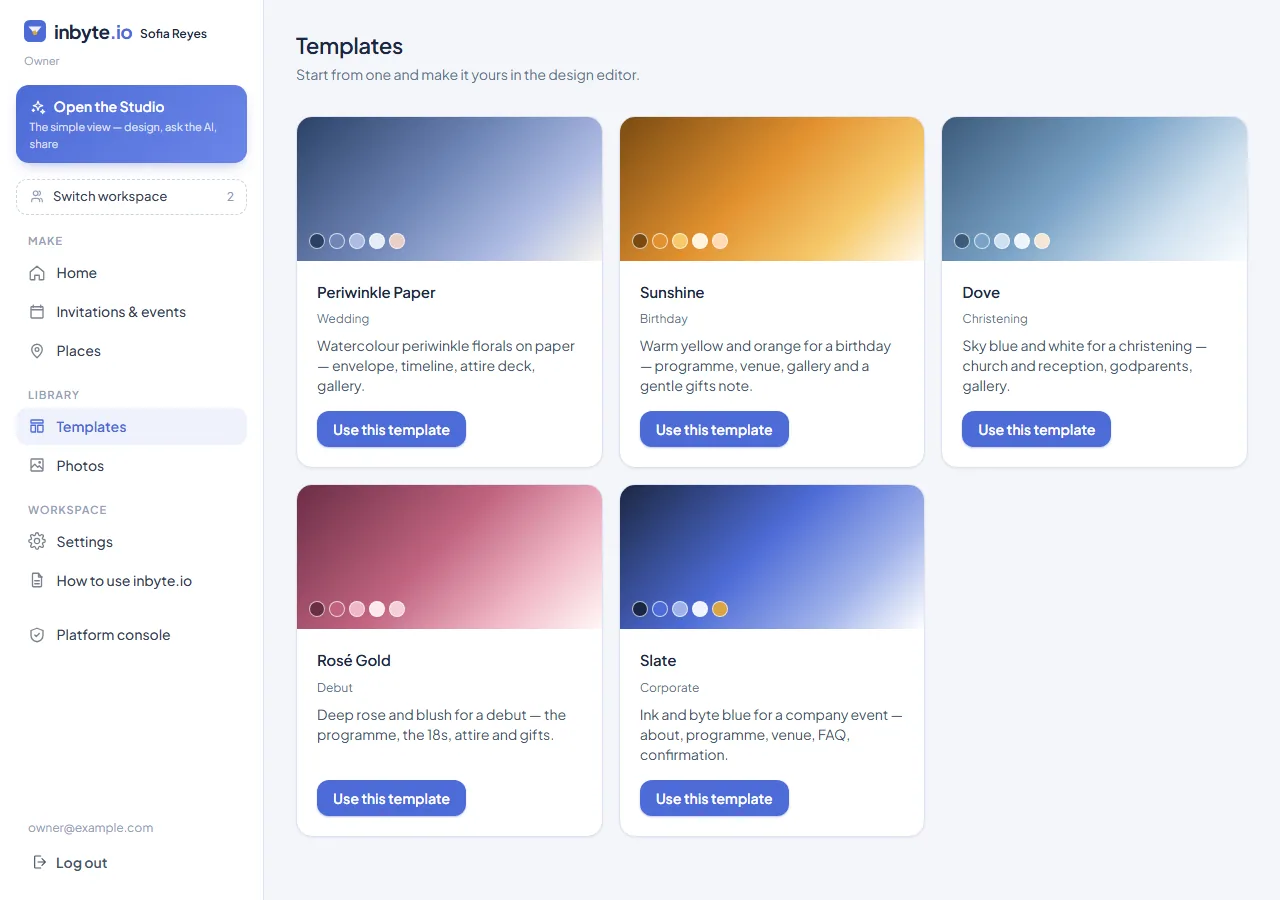
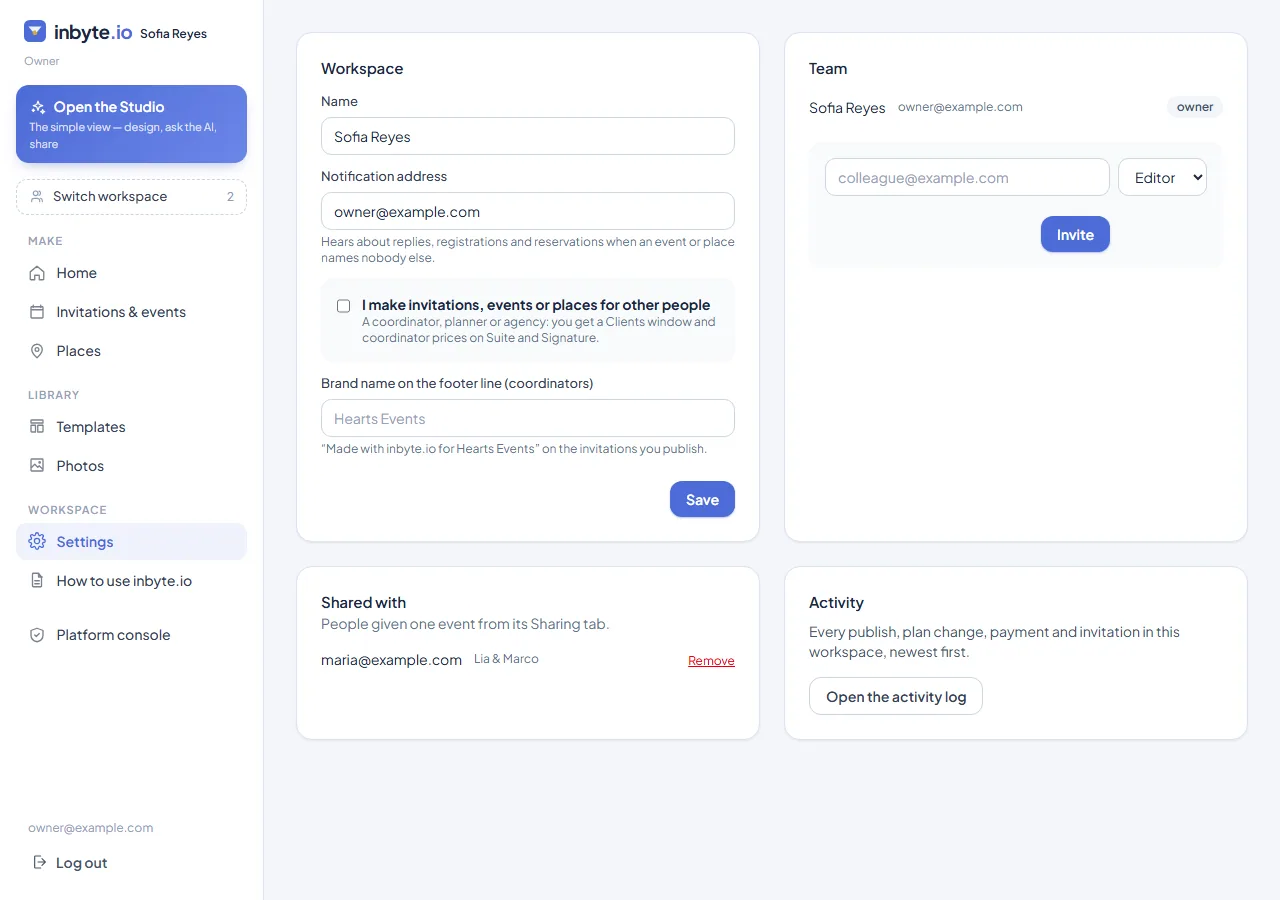
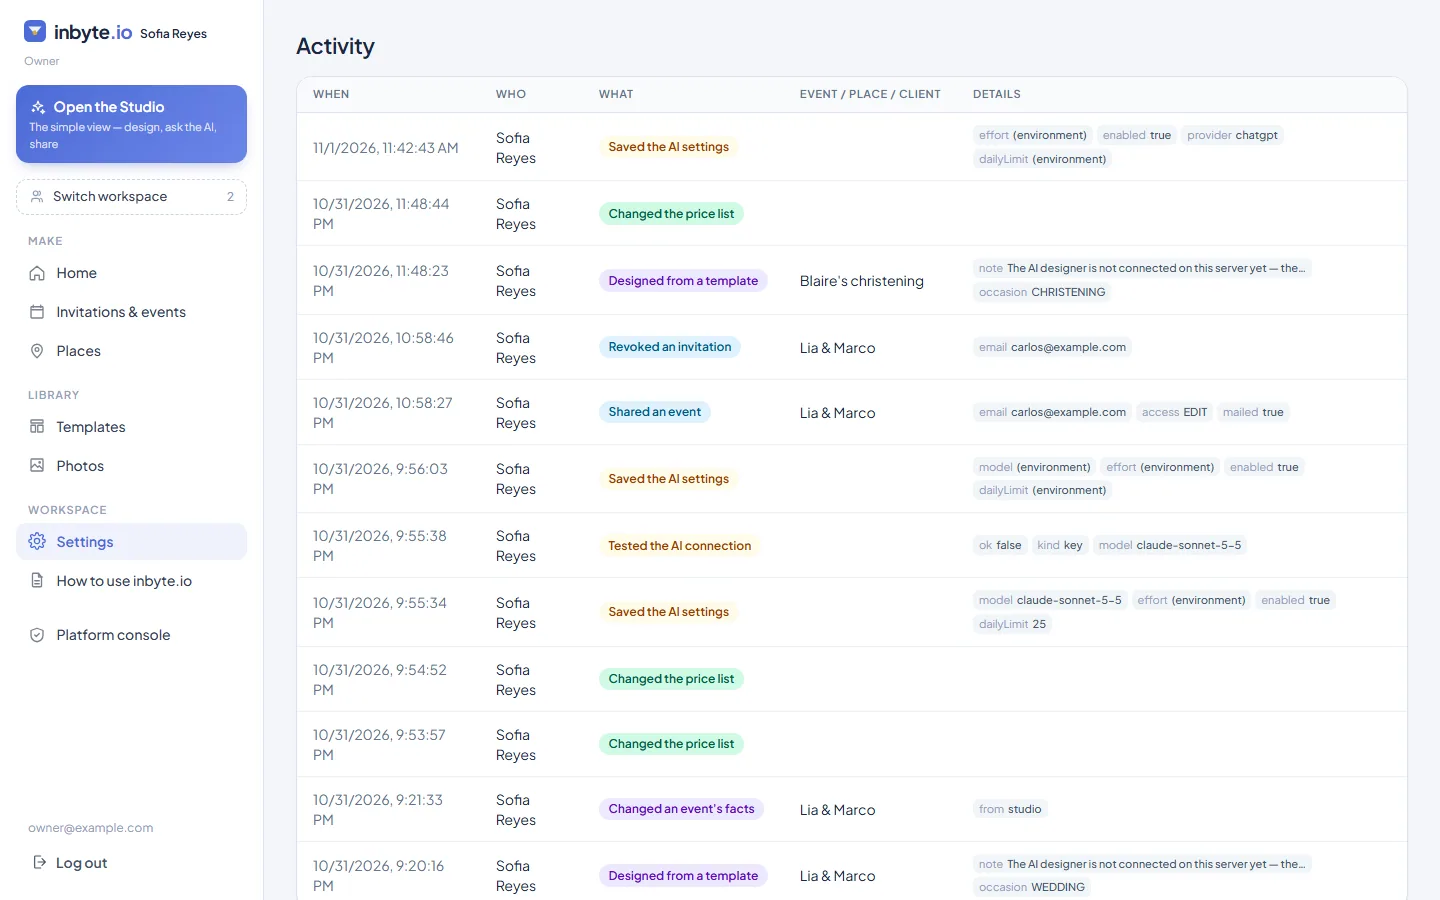
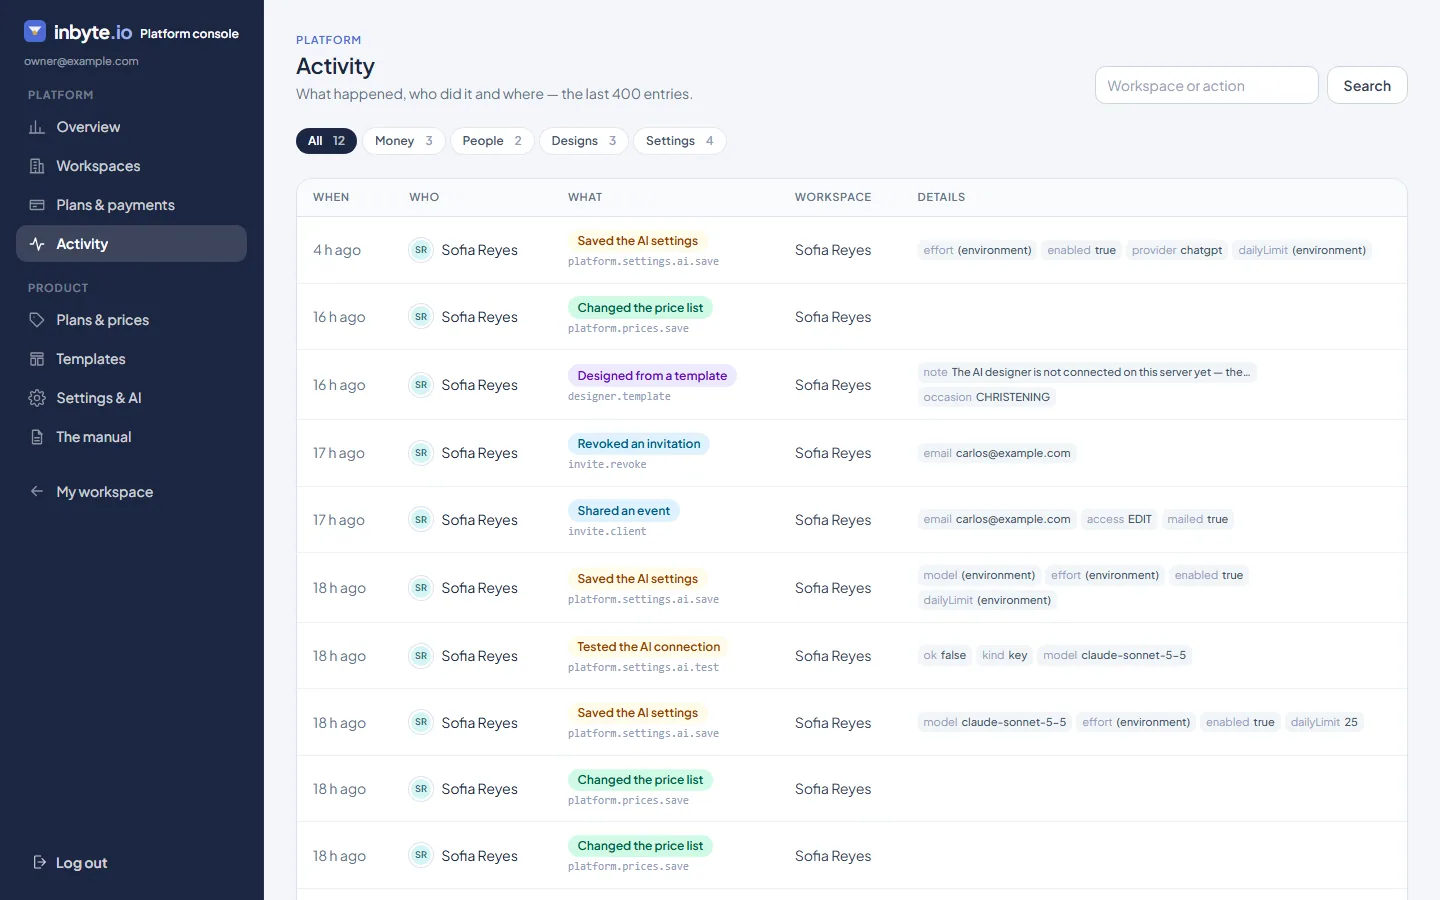
Photos is the workspace's picture library: everything uploaded to any invitation, ready to reuse. Templates are the starting points — the platform's own, and any you save from an invitation of yours. Settings holds the workspace's name, its brand, the email that receives replies and notices, and Activity: what happened, who did it and when.
Chapter 10
The platform console
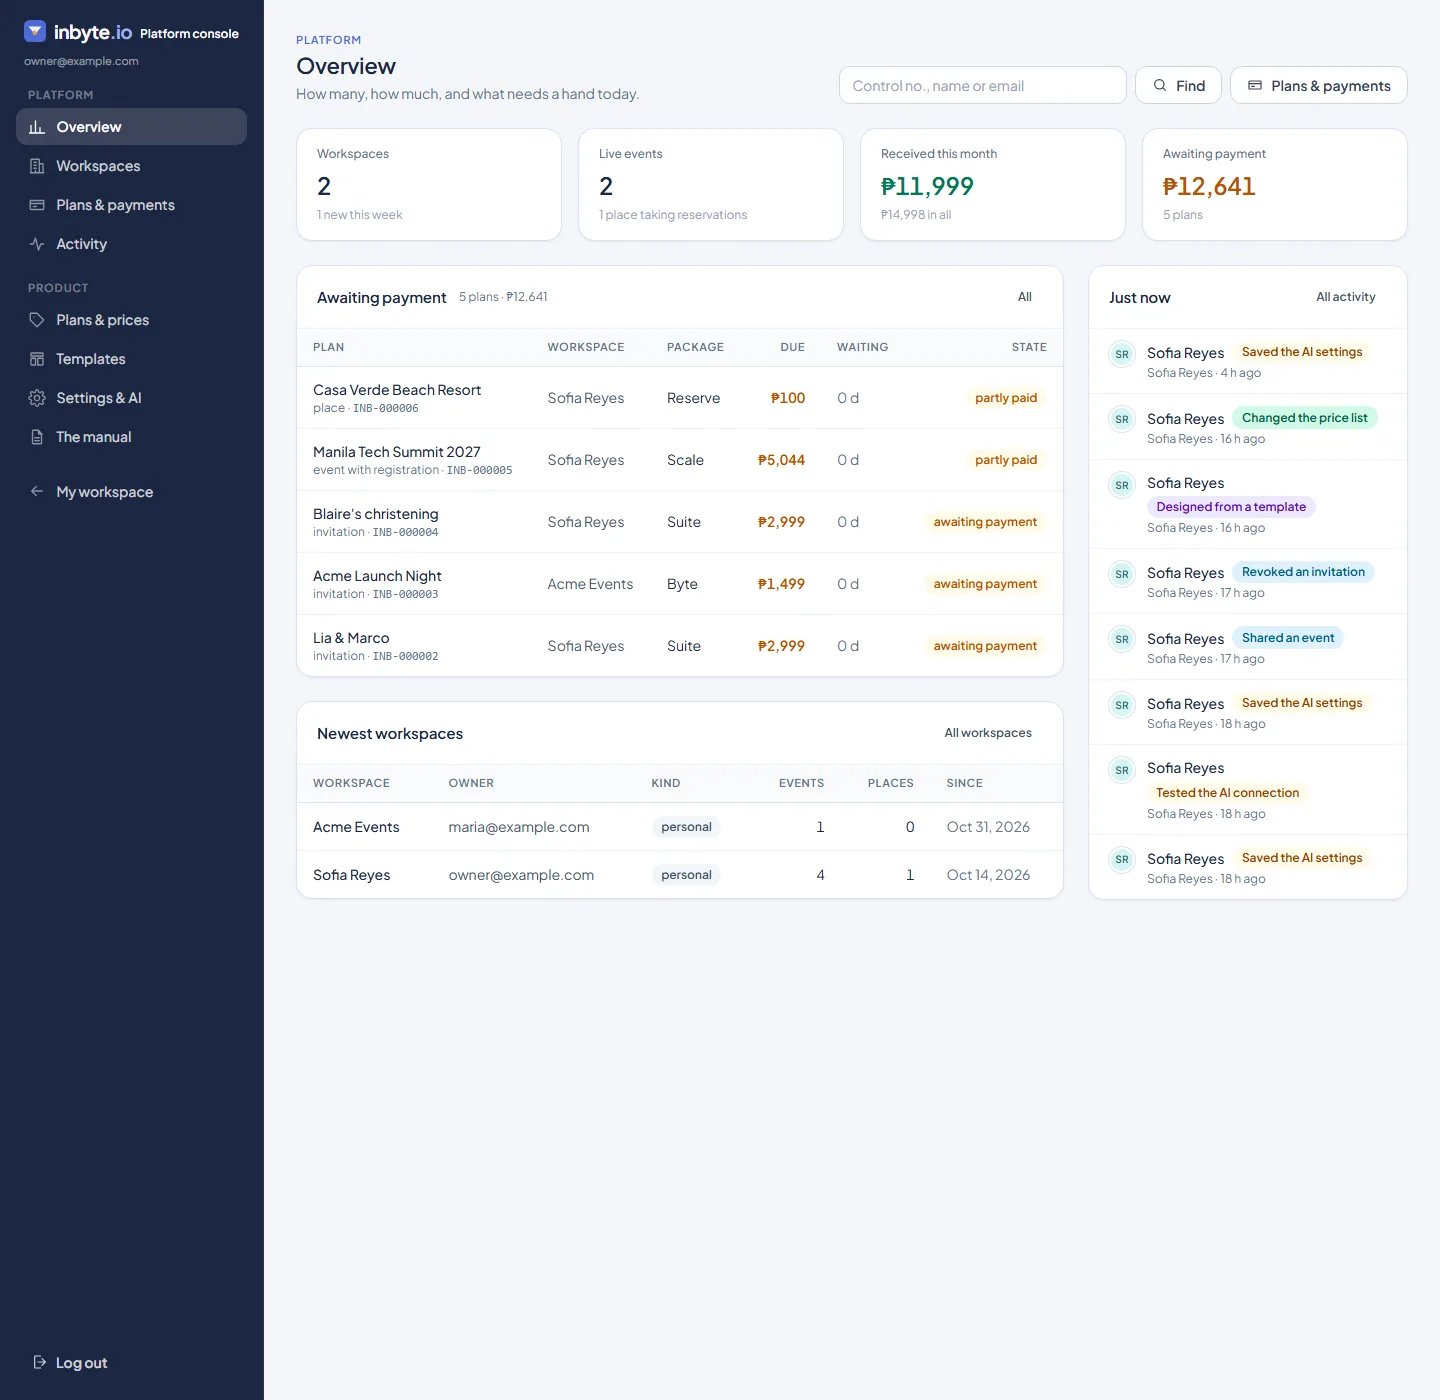
The platform console is for the people who run inbyte.io itself. It is at /platform, and only a platform administrator sees it. Its sidebar: Overview, Workspaces, Plans & payments, Activity, then Plans & prices, Templates and Settings & AI.
Finding a plan or a subscriber
The search box on the Overview and on Plans & payments takes a control number (INB-000123 — of a plan, or of anything made under it: a payment, a ticket, a reservation or a receipt), the invitation's, event's or place's name, the workspace, the subscriber's name or email, a referral code or a payment's reference. A control number is also said in words — what it is, with a link to the ticket, reservation or receipt. Plans & payments then lists the subscribers that match above the plans; Workspaces searches by the same names and numbers. Every plan panel shows the plan's control number and one per payment.
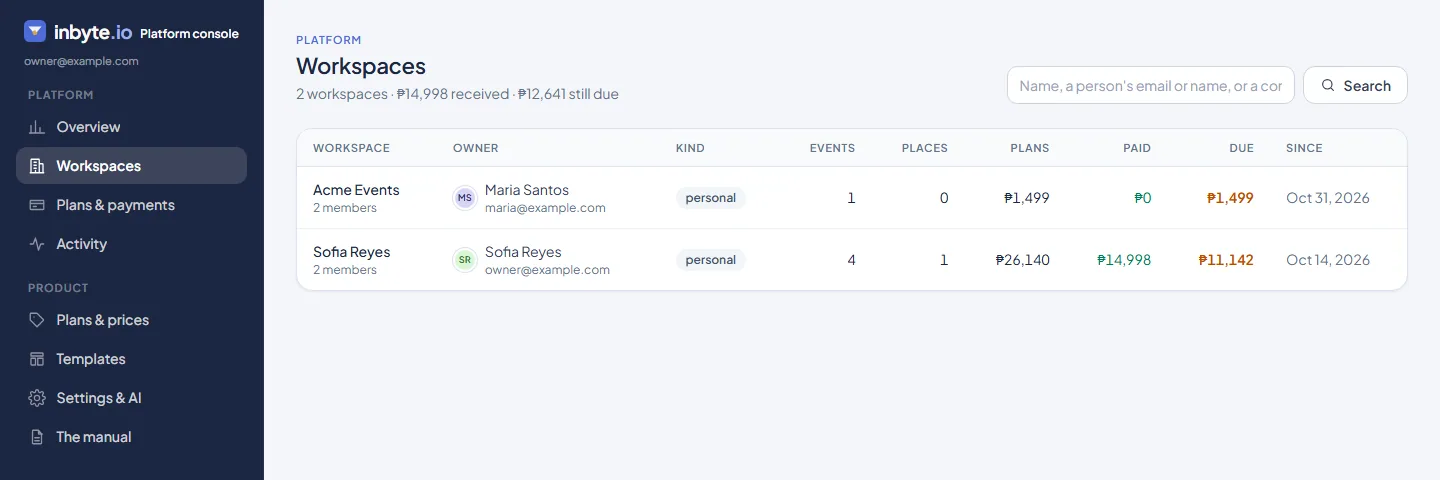
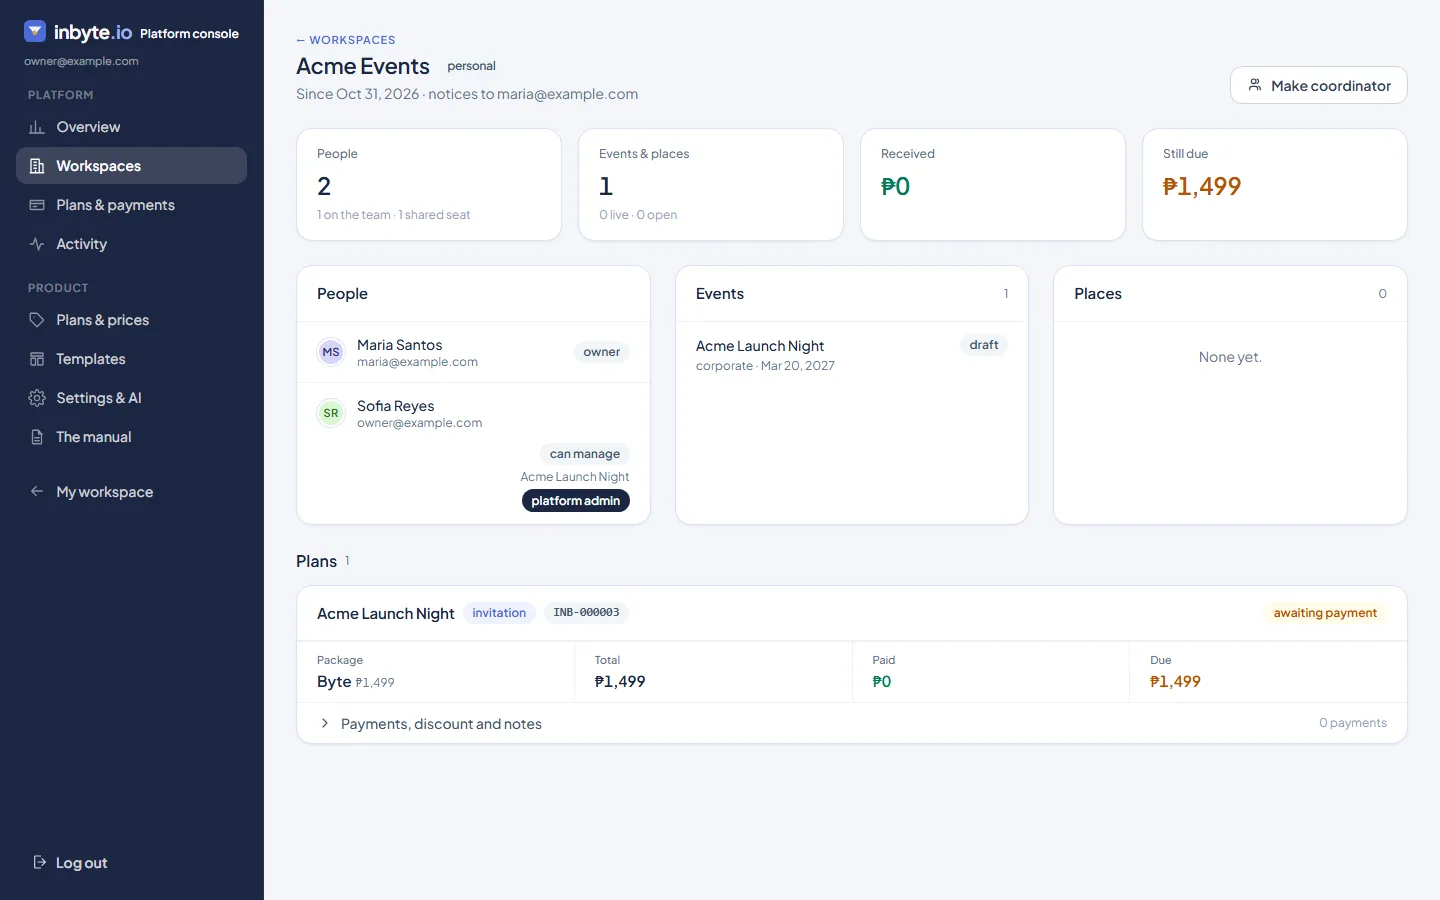
- Workspaces — every workspace on the platform, with its people, its invitations and events, and its plans. Open one to see it whole and to help its owner.
- Plans & payments — every plan sold, what was paid and how, each with its control number. A payment made by hand is confirmed here (it gets a control number of its own); a plan can be repriced from its card.
- Activity — what happened, who did it and where: the last 400 entries across the platform.
- Plans & prices — what a new plan costs from the moment you save. A plan already sold keeps the prices it was sold at.
- Templates — the platform's starting points; the ones marked offered are seen by every workspace, hidden ones by nobody.
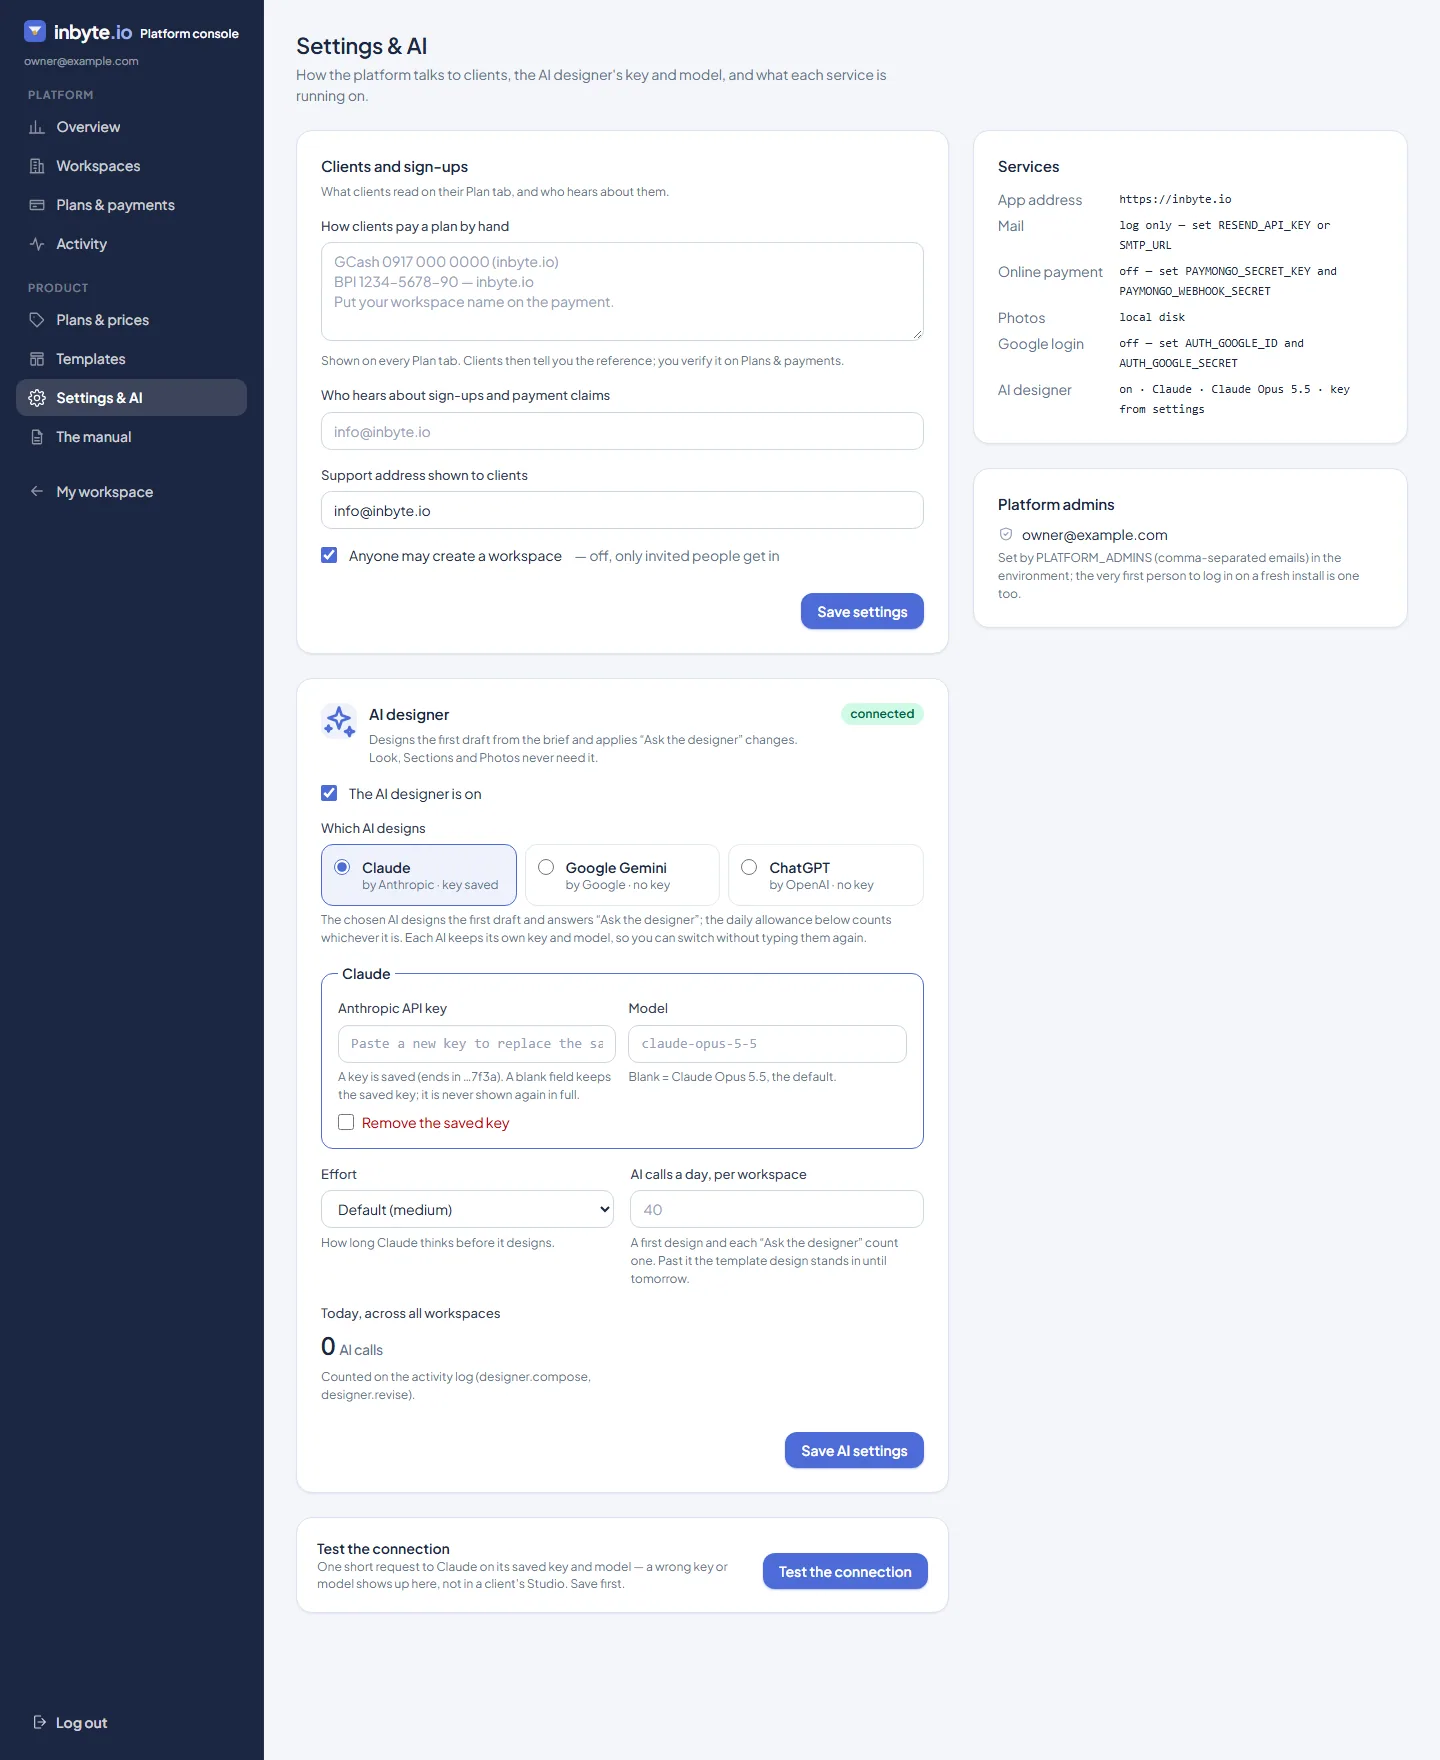
- Settings & AI — how the platform talks to clients; which AI designs — Claude (Anthropic), Google Gemini or ChatGPT (OpenAI) — each with its own key and model, so you can switch without retyping them; the daily limit; a button that tests the chosen one; and what each service is running on.
Chapter 11
Tips and troubleshooting
- I cannot publish.
- Publish says why by name. Most often the plan is not paid yet (chapter 8), or the invitation carries more photos than its package allows — take some off, or move up a package.
- My guest says the link does not open.
- A page is live for the plan's period from the first time it went live; after that it rests, and Extend a year wakes it. Check the Overview tab for the live-until date. Also check that the guest has the whole link: short links are the safest to send.
- Where are my replies?
- More → Replies in the Studio, or the Replies tab in the full workspace. The address on the invitation's Sharing tab is emailed each reply — or the workspace's notification address when the invitation names nobody.
- I changed the date — do I have to edit every section?
- No. Change it under More → Names, date & time; the countdown, the calendar buttons and the date in words all follow.
- Two of us edited at once and I lost a change.
- The one who saved second was offered Load theirs or Keep mine (chapter 7). Load theirs discards your unsaved edits for good — Undo is emptied with them — so copy any words you want to keep before loading theirs, or choose Keep mine; then ask the other person, whose version it is.
- Ask AI says the designer is off.
- The AI designer is switched on by the platform's administrator under Settings & AI — Claude, Google Gemini or ChatGPT, with a key and a daily limit. Everything else in the Studio works without it.
- What is the control number?
- Every plan, payment, reservation, receipt and ticket has one, INB-000123. It is on the Plan page, on receipts and tickets, and in the emails. Quote it when you write to the platform, and the administrator can find your plan by it in one search.
- I lost the login link.
- Ask for a new one on the sign-in page. Each link works once, for 24 hours — any link you were sent still works until then.
- Something else?
- Write to info@inbyte.io.